You know the drill: At the end of each of my travel guides, you will find a map on which you can see the location of all the featured landmarks, eateries, train stations, in short, all relevant places. This way, you can orient yourself quickly and easily during your own visit.
So far, so good.

I have been creating these maps for you for years.
But it wasn’t until some time ago that it came to mind that I could create a map on Google My Maps ahead of a trip to optimize my travel planning.
This way, I have my itinerary clearly arranged and with all the information in one place.
My personal little travel guide in my pocket – literally.
In this post, I’m introducing the basics of Google My Maps and getting into detail about how you can personalize it and use it exactly the way it suits you best.
First things first: You are most likely familiar with Google Maps, which is a great tool when travelling. However, there is also Google My Maps, and those are two separate, totally different Apps that offer very distinctive tools’n’options!
What makes Google My Maps such a fantastic tool is its versatility. It doesn’t matter if you’re just collecting random ideas for a trip or if you’re meticulously planning an itinerary. Although you can do a little bit of research on Google My Maps, too, it is primarily a tool to collect and organize your ideas. But it also helps you with the structured planning of entire trips. You can customize each map exactly the way you need it.
As adaptable and versatile as the final map is, it always starts with the first basic steps. So without any further ado, let’s jump right into it.
Creating a Map
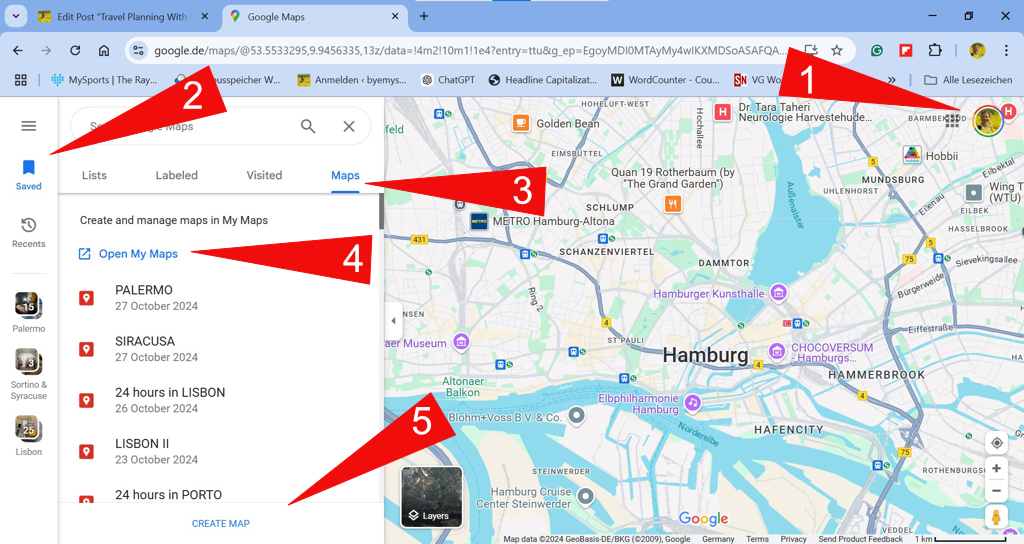
- Log in to your Google Account and open Google Maps.
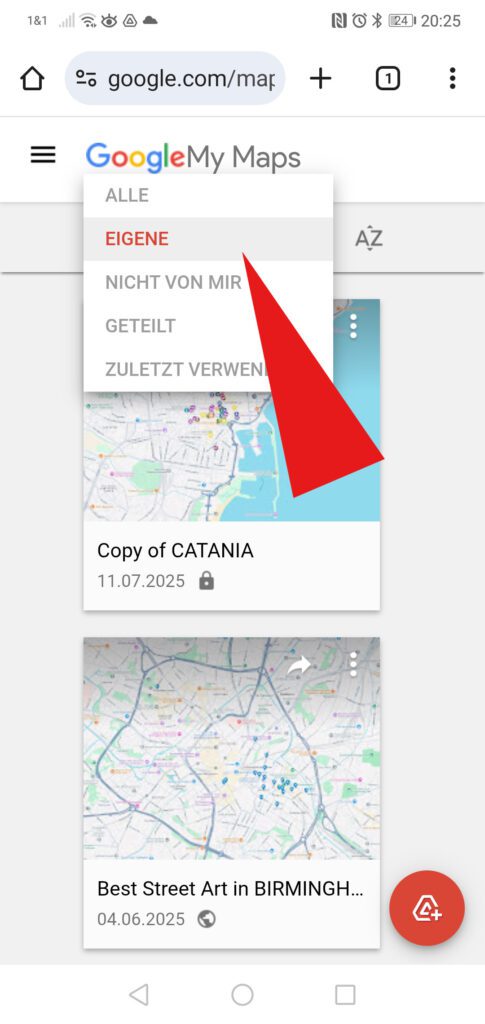
- In the left sidebar, click on Saved.
- Open the tab Maps. Here you see all the maps you’ve already created in the past. If this is your first, it will be empty, obviously.
- Alternatively, you can go straight to https://mymaps.google.com and take it from there. Either way, you need to be logged in to your Google Account!
- Now you can either open an existing map or start from scratch by clicking on CREATE MAP.
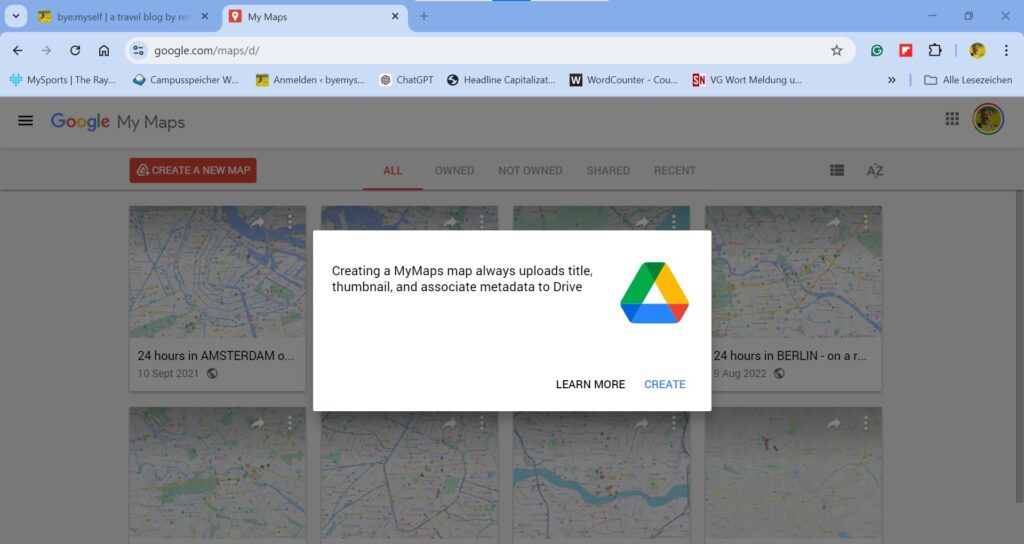
- Click on CREATE
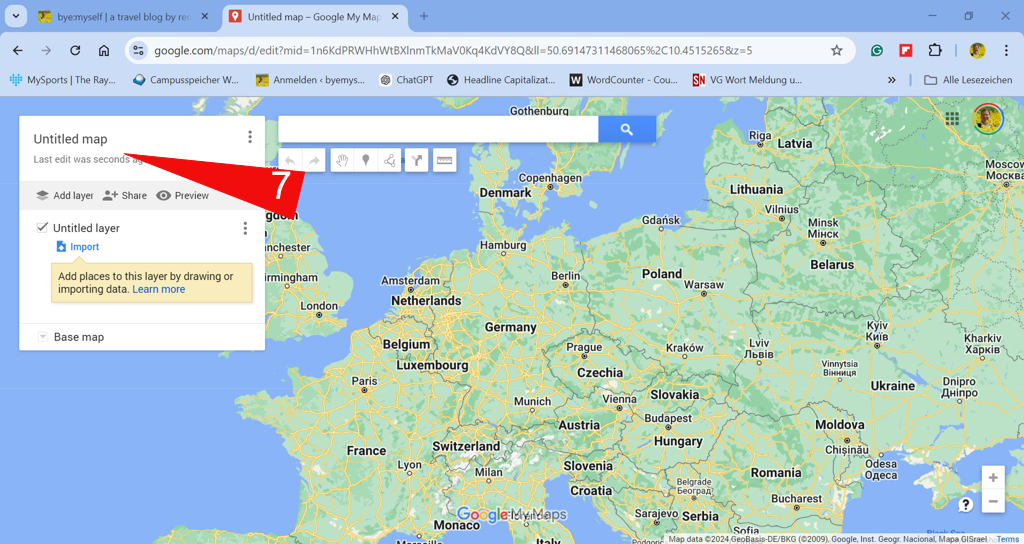
- Now the world is your oyster! Click on Untitled map to begin.
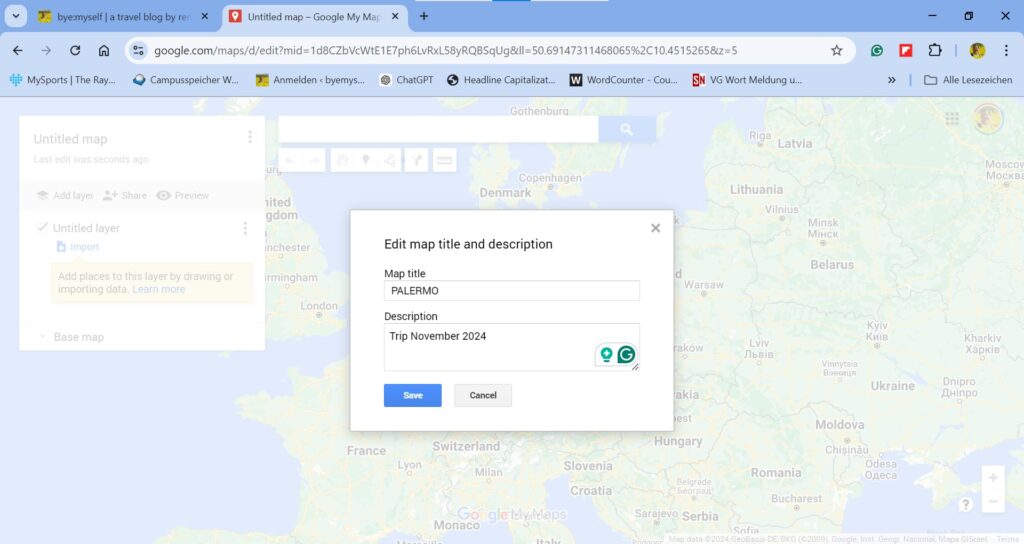
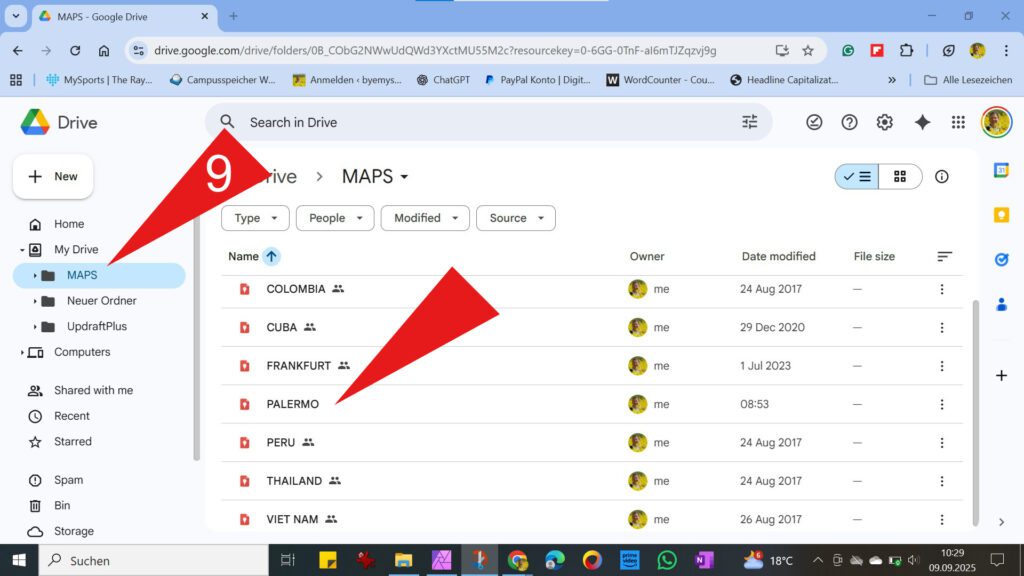
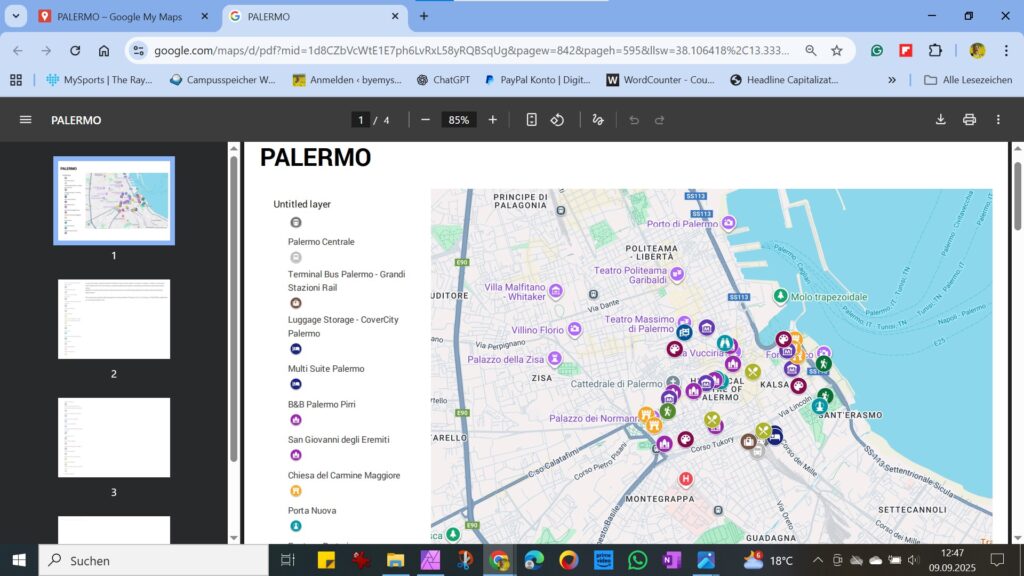
- Give your Map a title. In this example, we are creating a map for a trip to Palermo in Sicily. If you like, you can also add some information in the Description field.
However, you can do all of this at any given moment later on!
- It might be of interest that your maps are automatically stored in Google Drive, too.
Creating a Layer
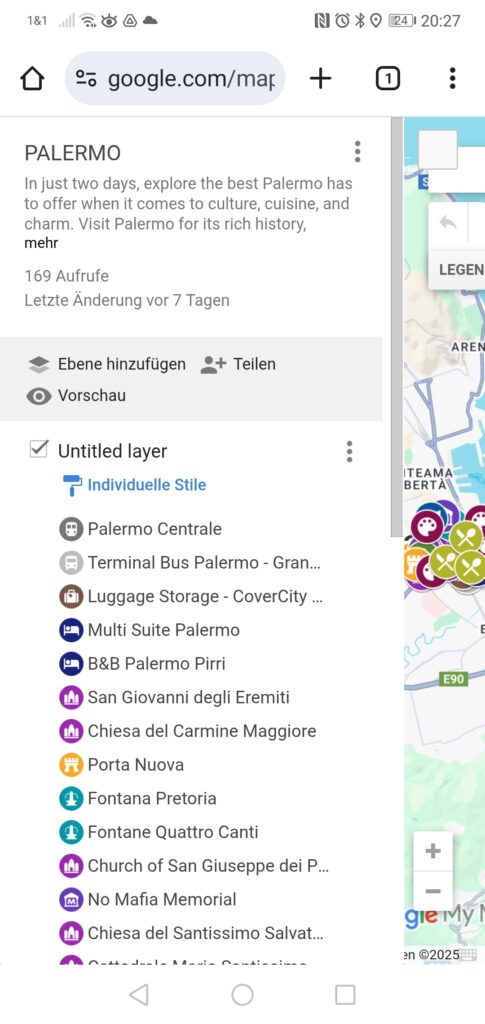
- If you like, you can now click on Untitled layer and give this first section a title.
At this point, keep in mind that you can create up to ten layers per map!
Therefore, structuring your map by weekdays makes only sense if your trip is not longer than ten days. However, if you want to plan a let’s say three-week trip with the help of Google My Maps, you can, for instance, create a map for each week. Each of these three maps can then consist of seven layers, one for each day of the week.
And no, you don’t have to create each of these three maps from scratch. Further below, I show you how to duplicate entire maps and export and import layers.
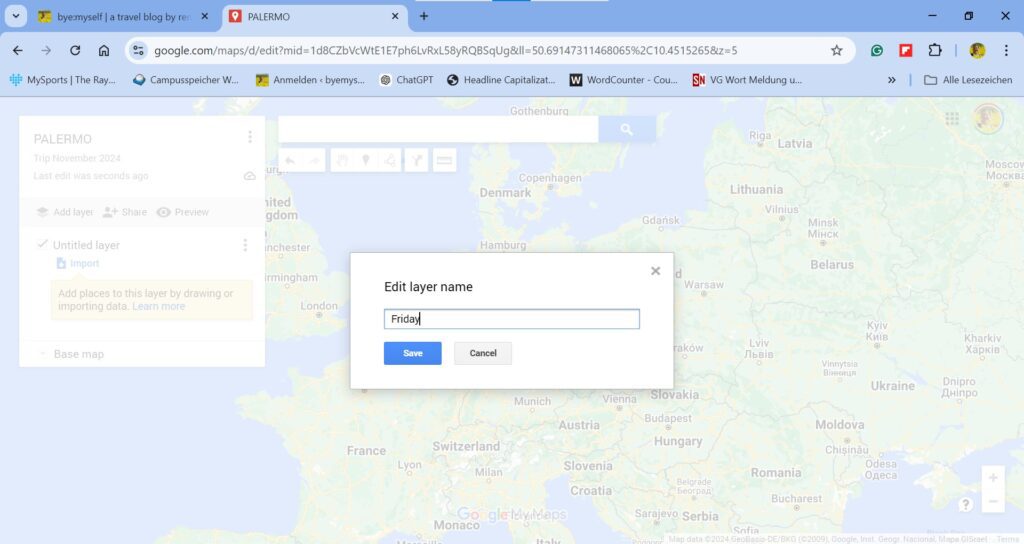
- My exemplary Palermo trip will be just a weekend trip. Hence, I’ll need only three layers, and I’ll label the first one Friday.
Either way, if it turns out that the way you’ve set up your project doesn’t work for you, you can always alter it at any given moment later on!
For instance, it might turn out to be more convenient to sort your map according to places. In this case, you could name your layers Museums, Stores, Restaurants, etc.
Adding Spots
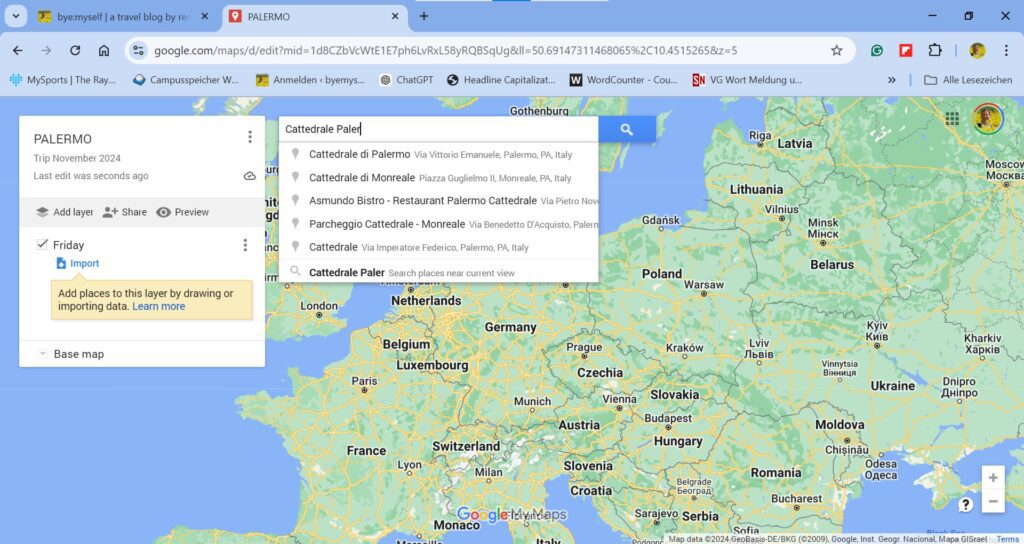
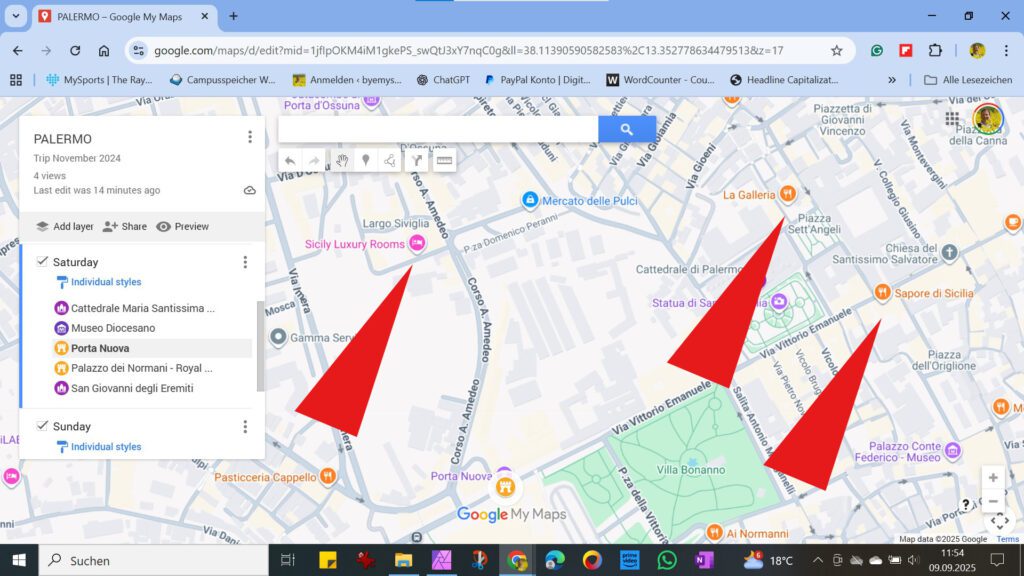
- Now it’s time to add all the places of interest to your itinerary. You can start with the train station, the address of your accommodation, or jump right into it and look for the first landmark, like I did in this example.
As you start typing, Google My Maps makes some suggestions. That’s already great, but what’s particularly smart is that as soon as you have set the first location, Google My Maps automatically searches for the other entries nearby.
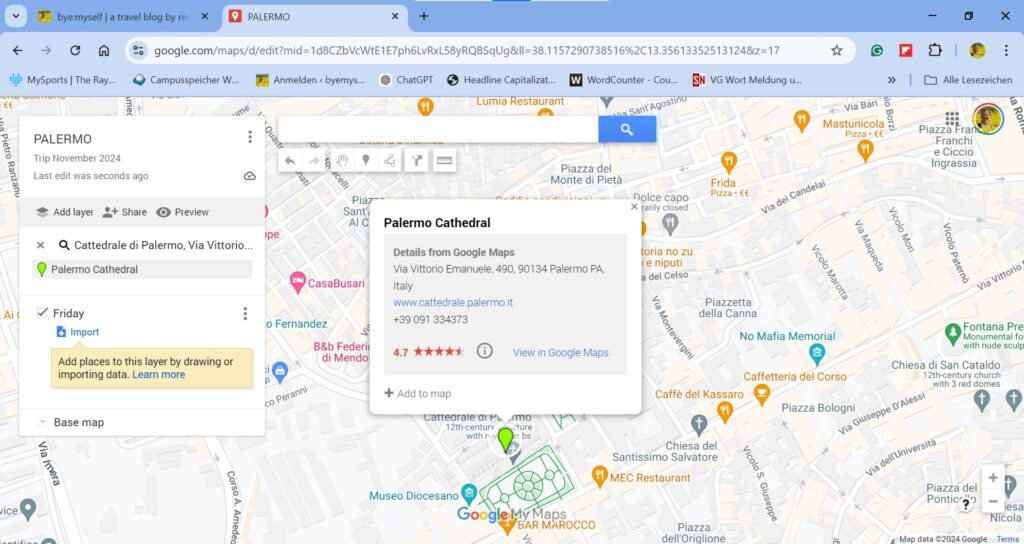
- As soon as Google My Maps puts the pin on the map, just click on +Add to map.
Note that once a spot is added to your map, you can move the marker around. This can be quite useful if, for example, you want to mark a very specific corner in a huge park. Google My Maps will place the pin in the center of the park, but you can drag it to the actual spot you want to mark as soon as you’ve added it. The same applies to streets: If you enter the street name, Google My Maps places the marker in the center. Once added, you can then drag the marker to the exact location you want to mark on that street.
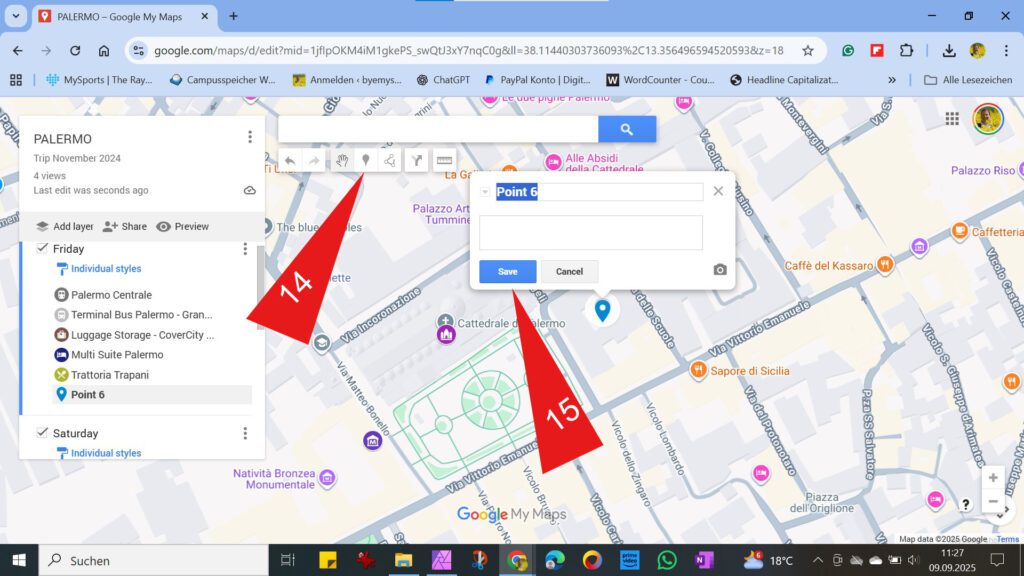
- But what if you want to mark a certain spot on the map that’s not defined? That’s easy: Instead of clicking on a spot on the map to create a marker, you do the opposite, namely, you first create a pin with which you then mark a spot.
In the bar at the top, you’ll find a marker icon. Clicking this icon allows you to pin any location on the map. - As soon as you mark the spot of your choice, Google My Maps opens a form where you can choose a title, insert a description, and add an icon.
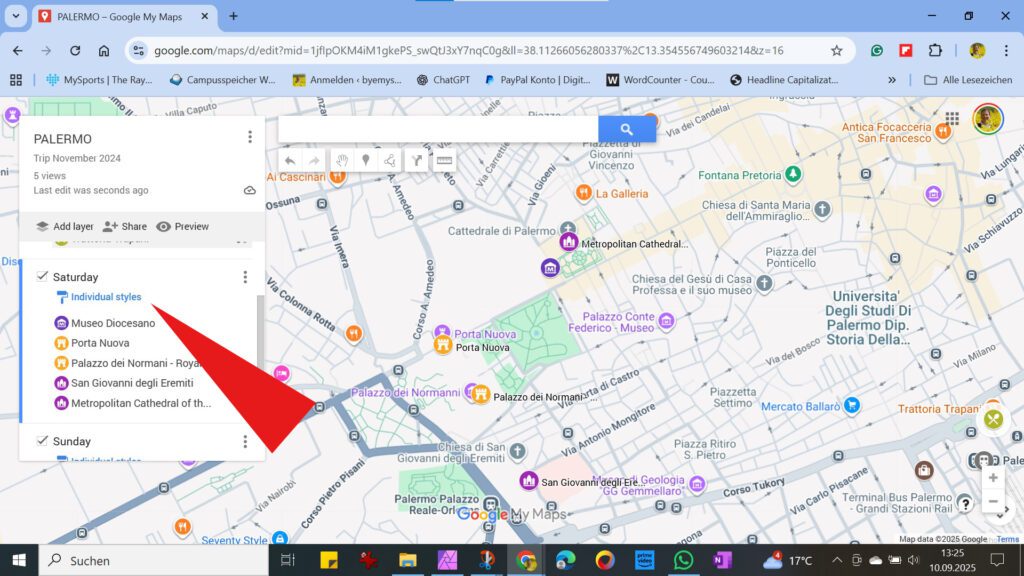
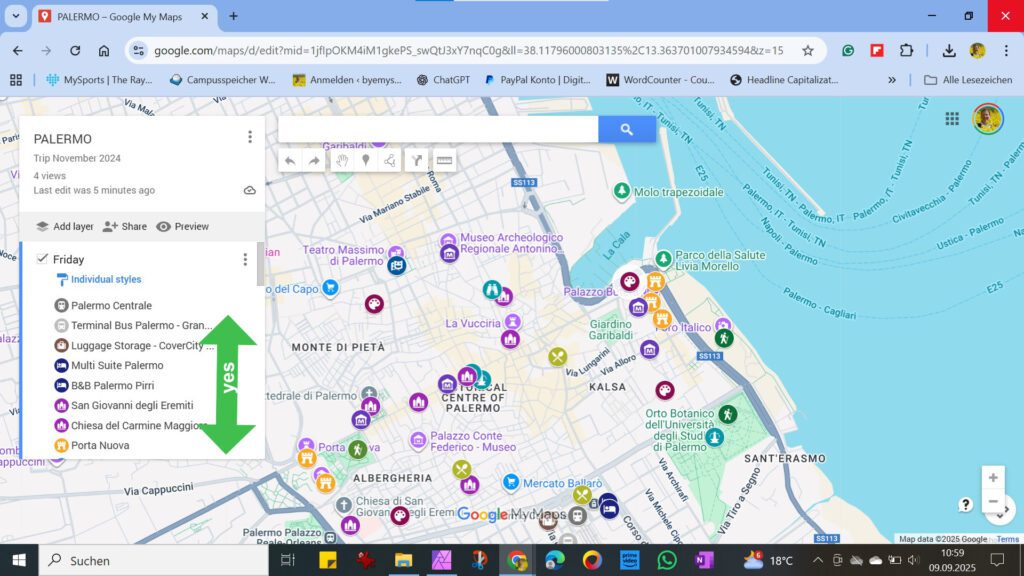
- You can insert locations randomly into different layers of your map. To do so, you simply click on the corresponding layer. The slim blue bar on the left indicates which layer you are currently in. If you misplace a location, it’s not a problem, because locations can be moved not only within a layer but also between layers.
This is also helpful later during your trip: If you have planned an activity for the first day and you didn’t have the time, you simply drag that marker to the next day’s layer.
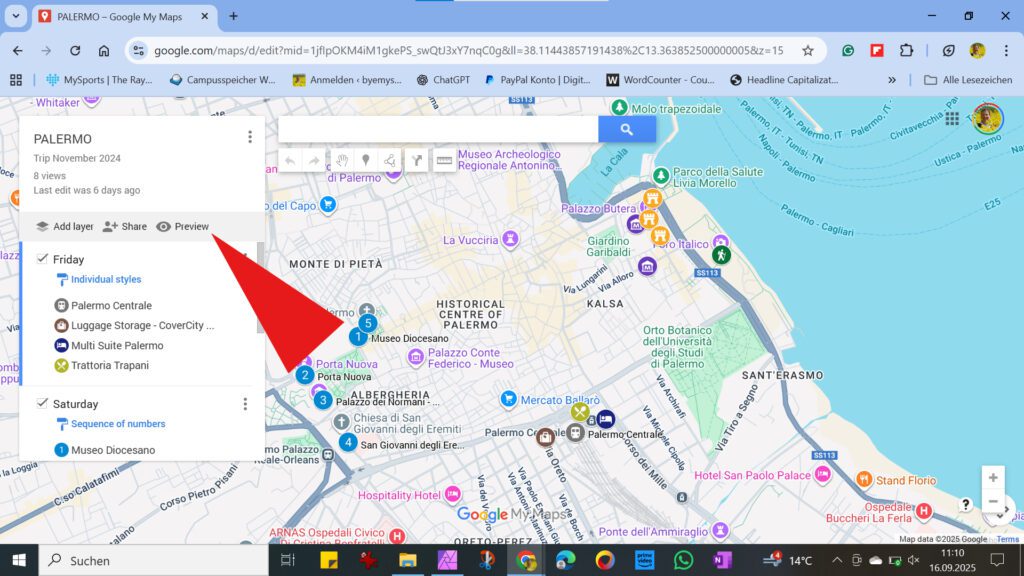
Customize Markers
- You can see on the maps above that my markers don’t match the default style of Google My Maps.
Indeed, your map will be even clearer if you customize the individual pins. There are several ways to do so.
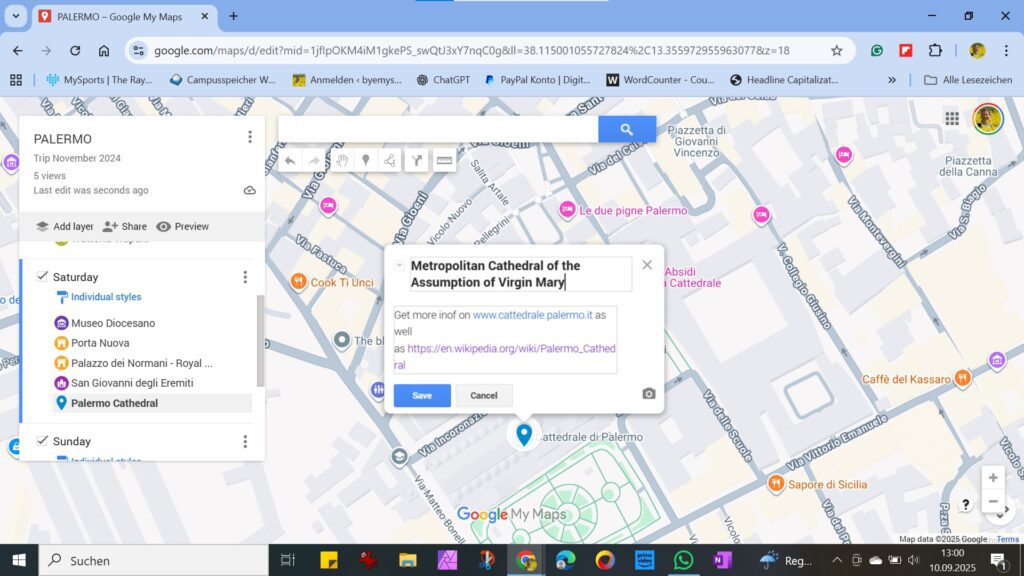
Firstly, you can adjust, change, or add to the title and the text. To do so, click on the small pencil. Now you can adjust the title at the top and also change, add, or delete the text in the box.
Obviously, you can also paste links in these boxes. These might bring you to confirmations of online reservations of hotels and restaurants or background info on a certain landmark. This way, everything you might need is just one click away!
Note that the URL will only become a clickable link after you saved your changes.

- Now you can adjust the marker to make it stand out better on your map or, for example, to indicate the location of the marked spot immediately. To do so, click on the small paint bucket. From the palette that opens, you can choose a color you like. I find it helpful to assign certain colors to specific locations. For example, I always choose dark purple for museums, cardinal red for churches, yellow for historical buildings, etc.
- Next, I select the appropriate icon from the icon palette. You see that Google My Maps already offers a choice of the most popular icons. However, you can also choose from many more as you click on More Icons to open the databank.
- Note that once you use a specific icon in your current project, it will appear in the section below the preselection.
- To find suitable icons more quickly, you can enter a search term like plane or hotel in the filter box in the upper right corner of the icon databank. I have to warn you, though: Firstly, the selection of icons isn’t that large, and secondly, the terms probably don’t always match what you were thinking. For example, you won’t find church under the keyword Church but under Place of Worship. Don’t ask me who came up with this easter egg.
However, sometimes it’s easier to find something that suits you by just scrolling through the icons.
- Another option would be to color-code the activities by day: Everything you want to do on Friday is colored red, Saturday is colored blue, and Sunday is colored green. This gives you an overview of where the various locations are clustered, and you can perhaps make a few adjustments.
Keep in mind that the only thing that matters is that you manage well and that the map helps you plan. There are no hard and fast rules, all I do is give you ideas and make suggestions!
Google My Maps makes adjusting an already existing layer ridiculously easy: Click on the blue paint roller below your layer’s title.
- Choose Uniform Style from the dropdown menu, and all the markers in this one layer will be transformed into blue pins.

- In the next step, you can all alter them to your liking by clicking on the little color bucket. Now you can change the color as well as the icon, as explained above.
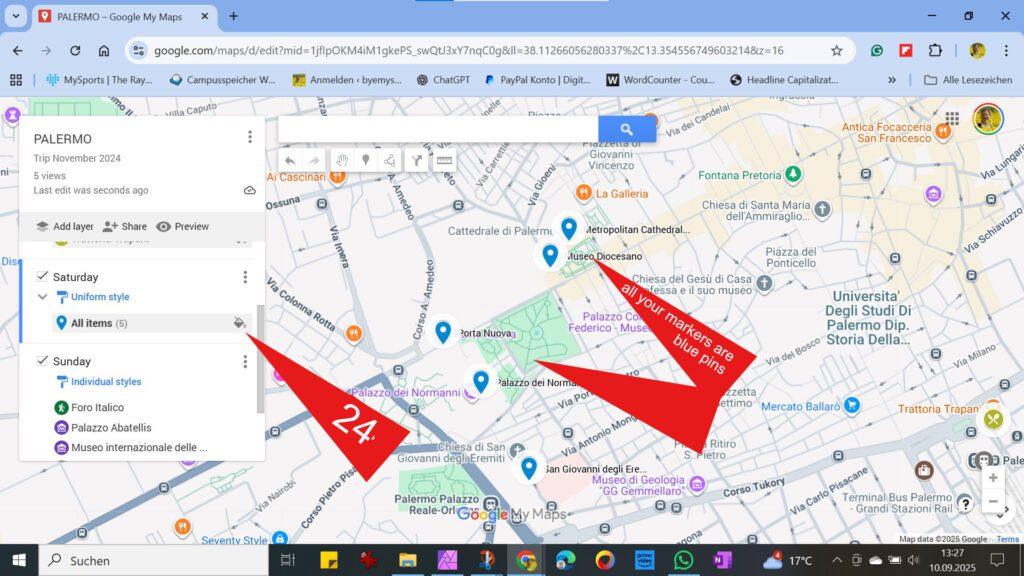
Below, you can see how I changed the blue pins into orange museum icons with just one click!
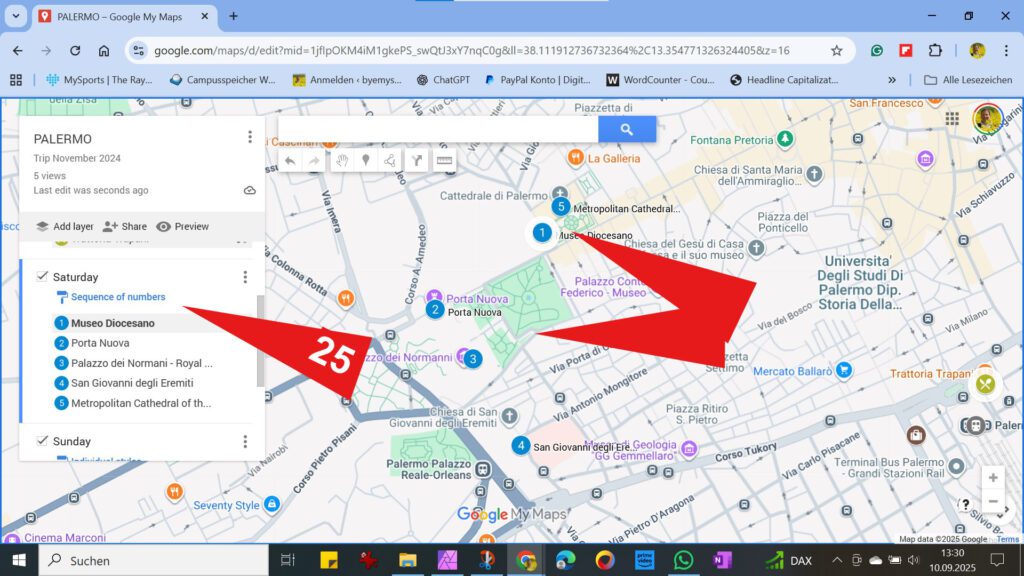
- Finally, here is also an example of what it looks like when you change your markers into Sequence of Numbers. Once you’ve done that, you can change the color of the numbers, too.
Adding Photos to Your Map
- Finally, you can also work with photos. There are two options. One is to upload a photo as a marker and insert it into the map just like the predefined icons.
To do so, open the icon database and click on Custom Icon.
Now you can choose how you want to import a picture.
At this point, I’d like to emphasize again that you should always use only your own photos to avoid any kind of copyright infringement. You can find further information and advice on this topic in my post How to Avoid Copyright Infringement: Unexpected Traps.
- Now your picture appears in your icon database. But note that it will be there only for this one specific map. If you want to use it in another map, too, you have to reupload it there again.
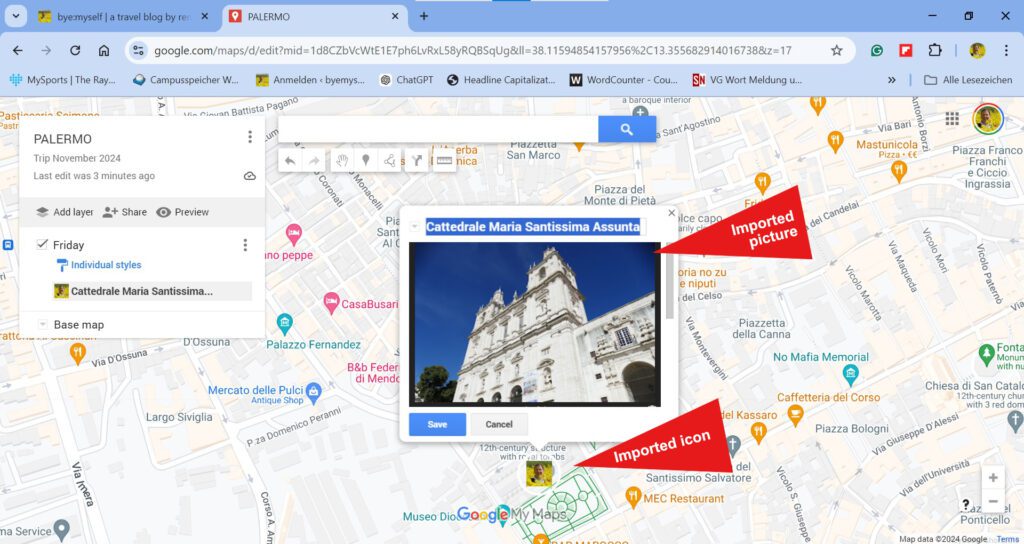
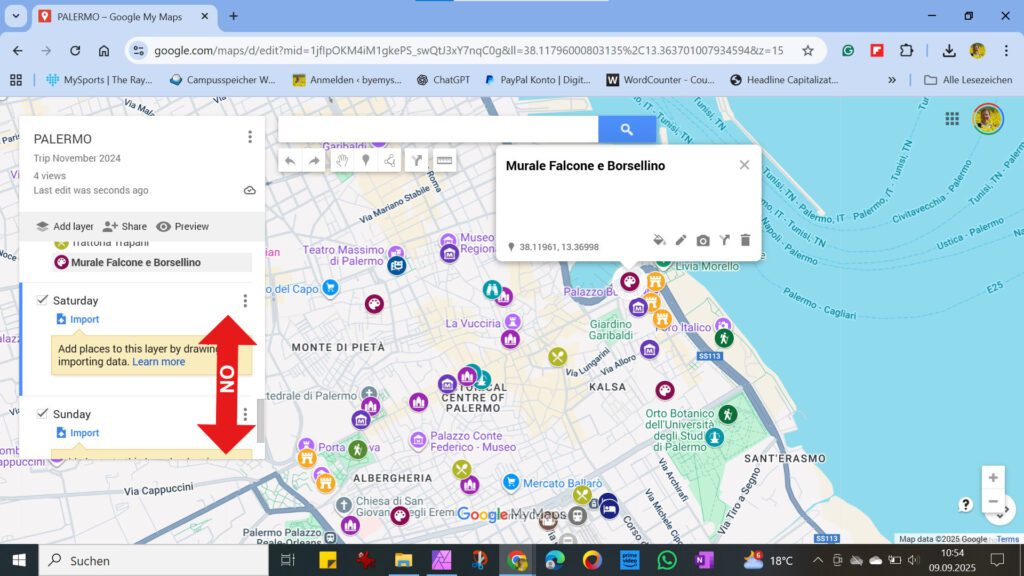
- The other option is to upload a photo right into the info box. This can be helpful, for example, if you’re looking for a specific building or mural. If you upload a photo, you can compare it on-site.
The steps are basically the same, only that you have to click on the little camera in the editing menu of your marker to open the import mask.
- While you have to actively choose your customized icon to insert it in your map, the imported file of your choice will automatically appear in the marker description.
As I pointed out above, you can repeat the steps from #9 to #18, sorted in up to ten layers, as often as you like and then edit the markers to your needs’n’liking.
Gaining Information and Inspiration
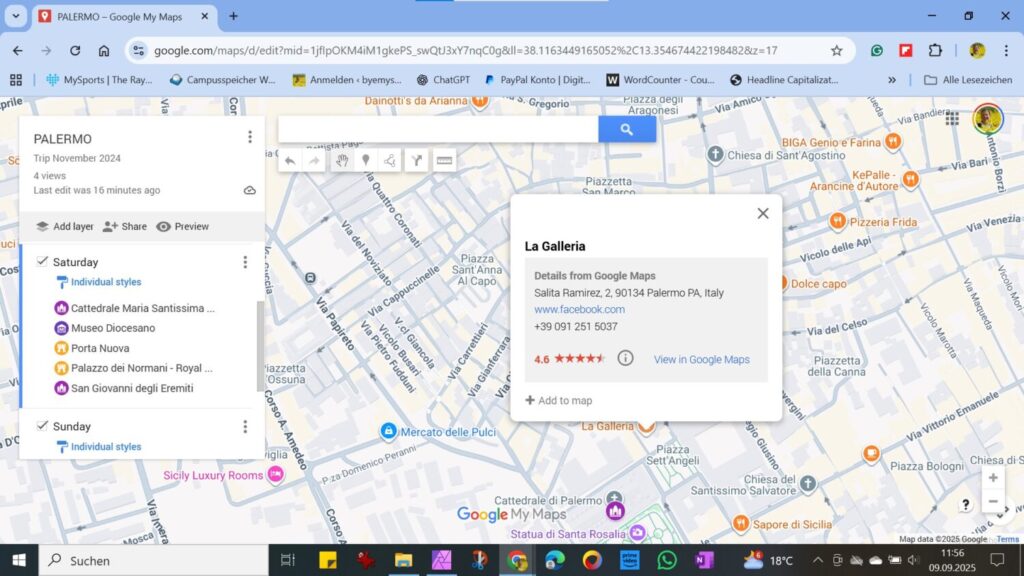
- Finally, based on the map you created, you can check which hotels, restaurants, stores, and other facilities are near your places of interest.
- As you click on them, an info box with the exact address, reviews, and a link to the website will open.
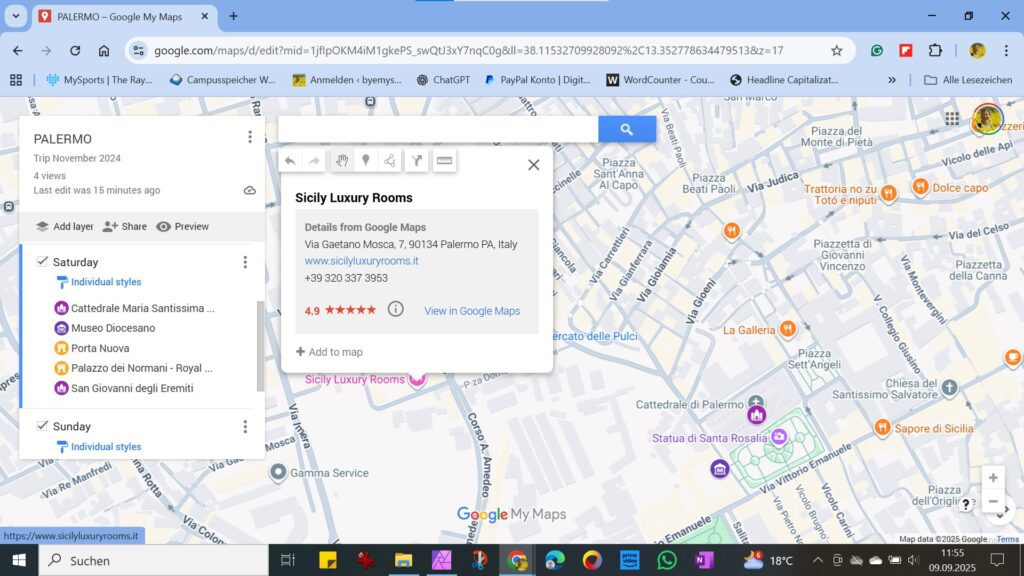
- Obviously, you can now simply add this place to your map as described above.
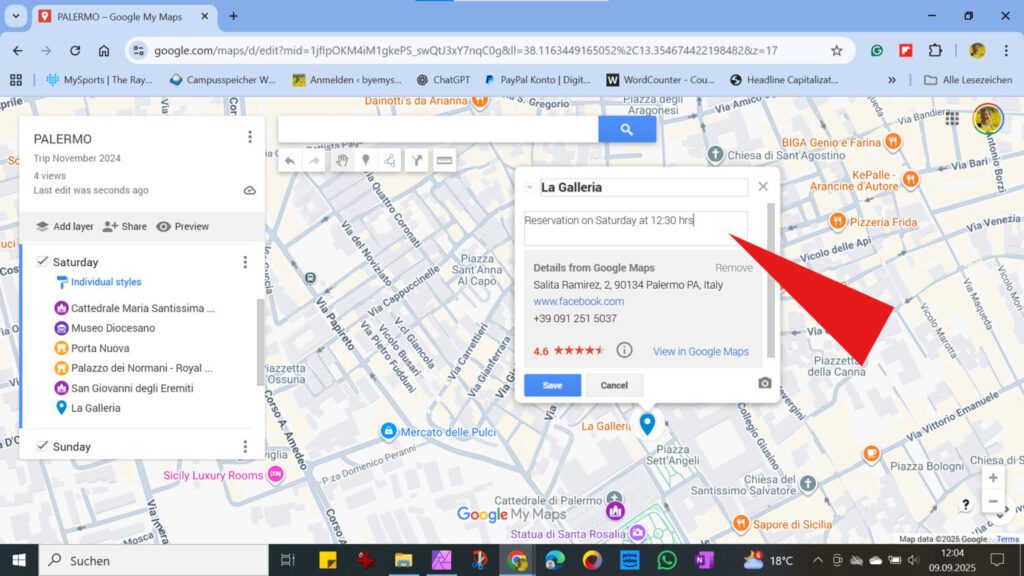
Once added, you can alter the text in the title or the description by, for instance, adding the date and hour when you made a reservation or any other info of your choice!
Adjusting the Order
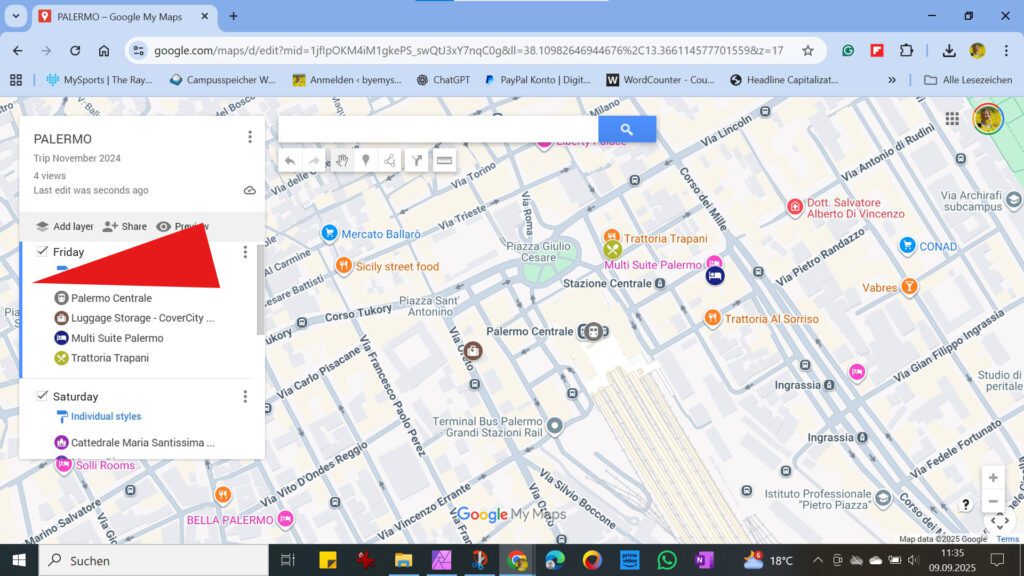
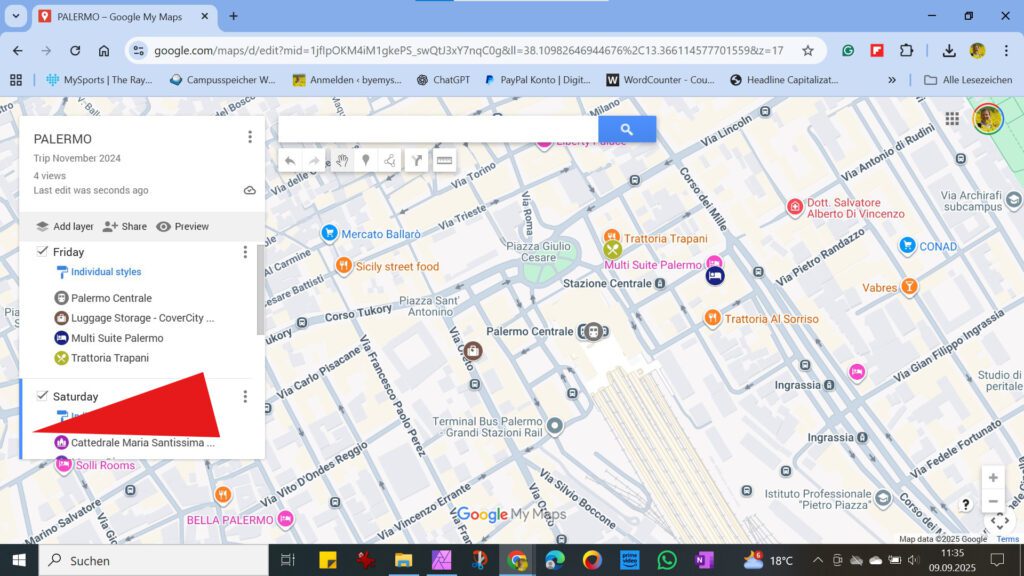
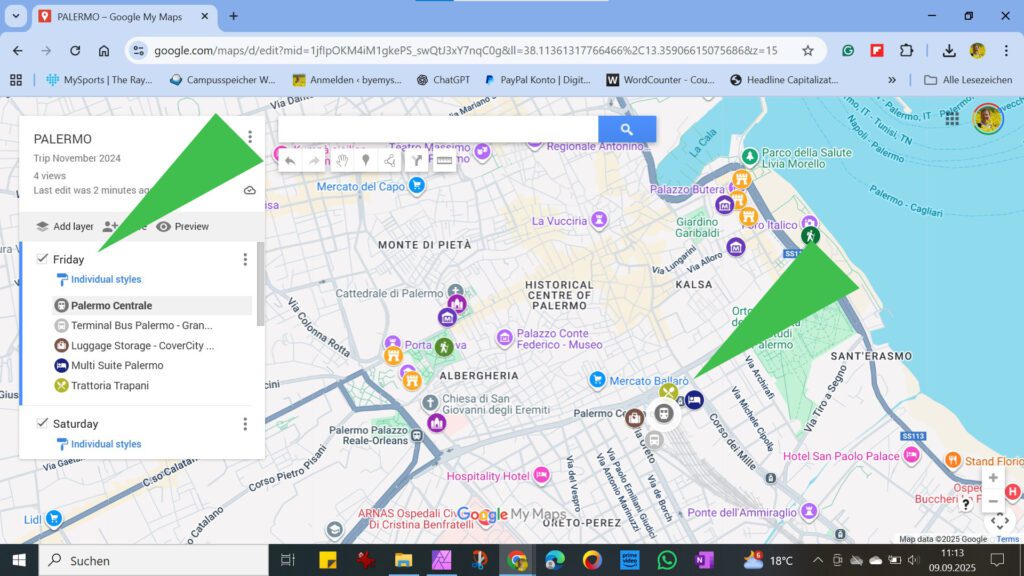
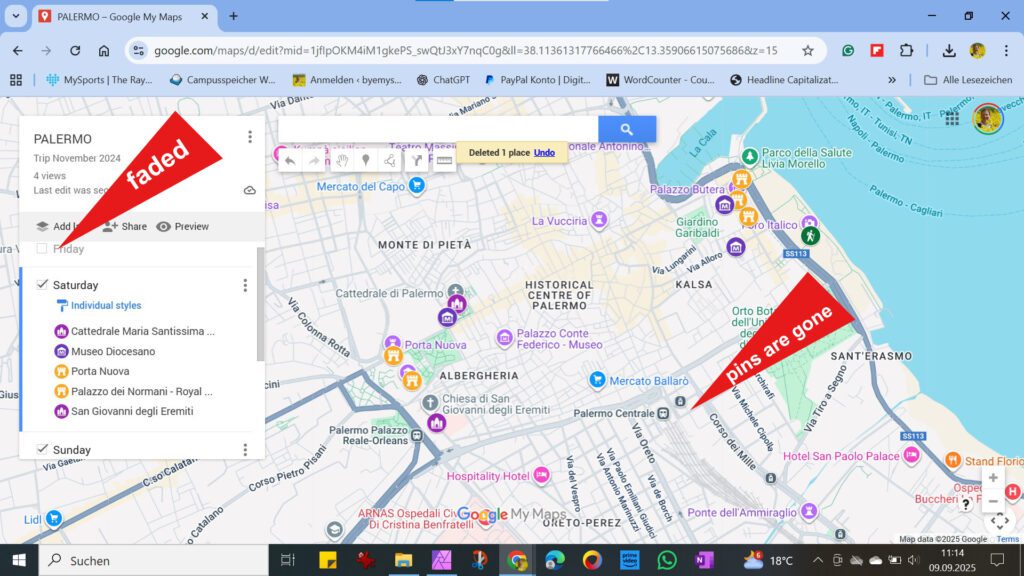
- While you can shuffle individual spots up and down and thus change their order even between different layers, you cannot alter the order of the layers as such.
- However, you can turn the individual layers on and off, which makes your map clearer. If, for instance, you’ve organized your map according to days, on Saturday, you can turn off the Friday and the Sunday layer and see only what’s on for that specific day. Obviously, you can also delete individual layers, but be careful, as once deleted, they cannot be restored!
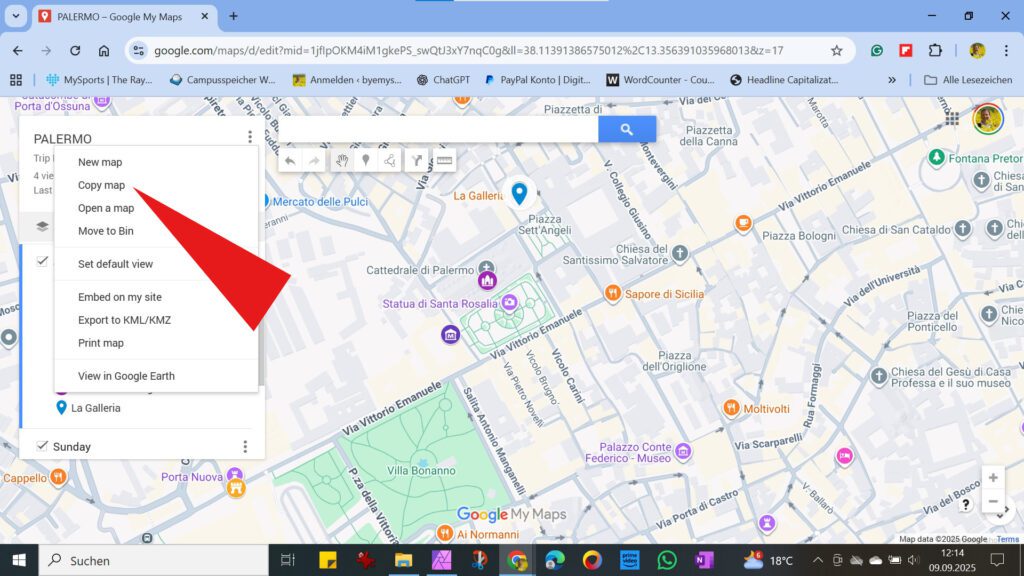
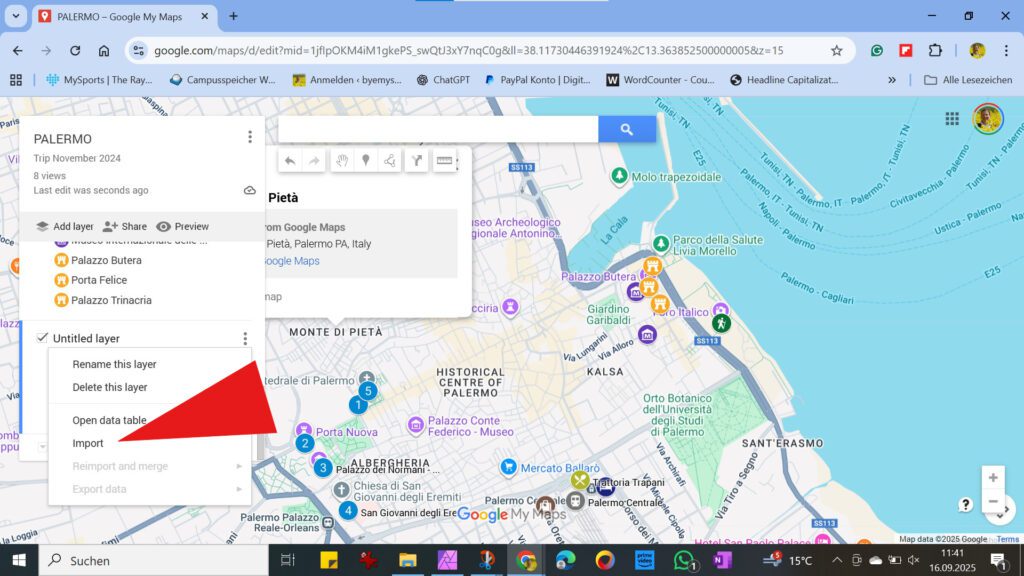
Duplicate, Export, And Import
- Sometimes it’s not even necessary to create a map from scratch. You can use an existing map or transfer individual parts. Duplicating a map is very easy. Click on the three dots next to your map’s title and select Copy Map from the menu. The system will then create a new, identical map, which you can rename and further edit.
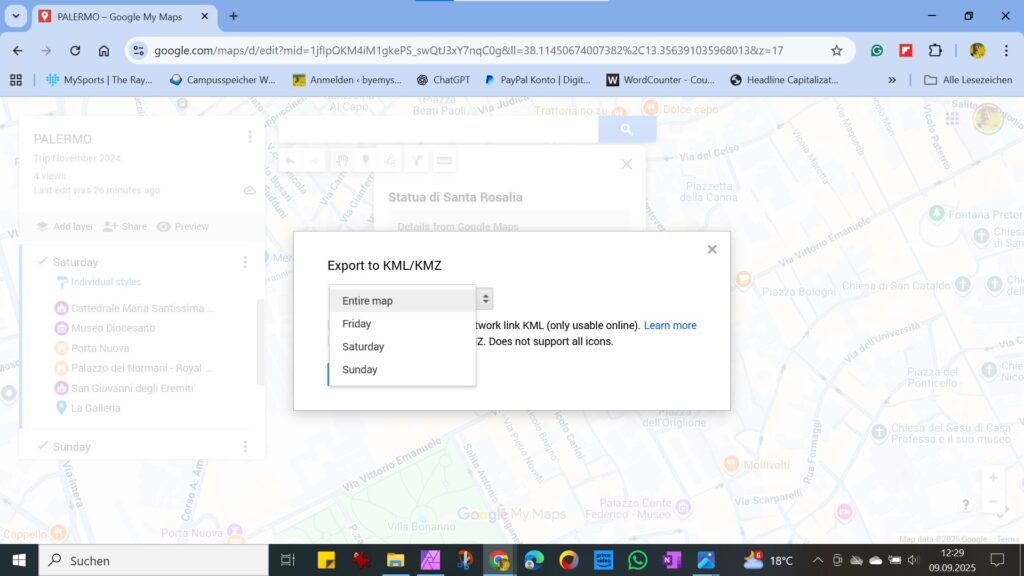
- You can also download the marked spots of your layers or even the entire map. Click on the three dots next to the map’s title and choose what you want to export.
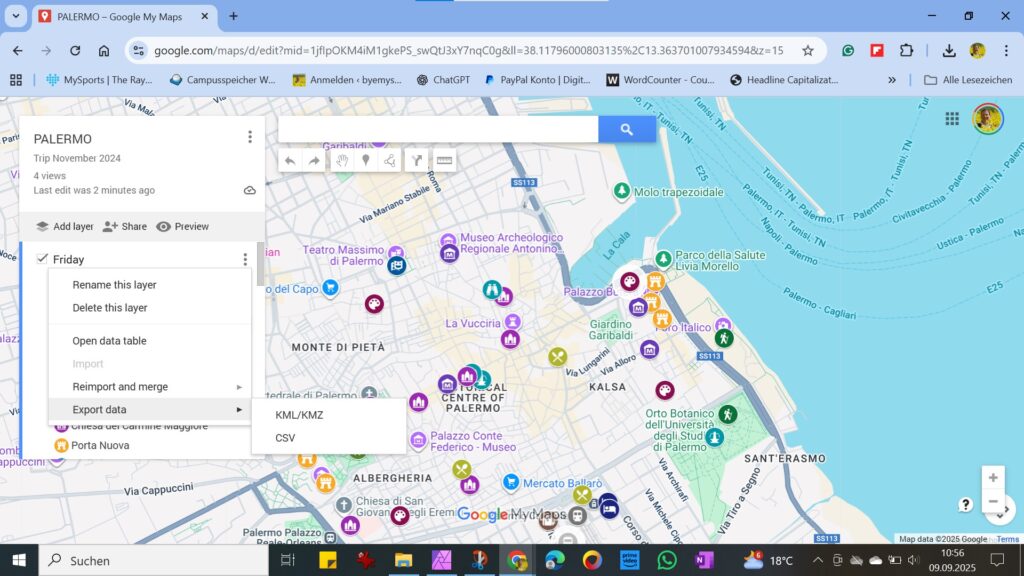
- Alternatively, you can click on the three dots next to the layer’s title and export it from there.
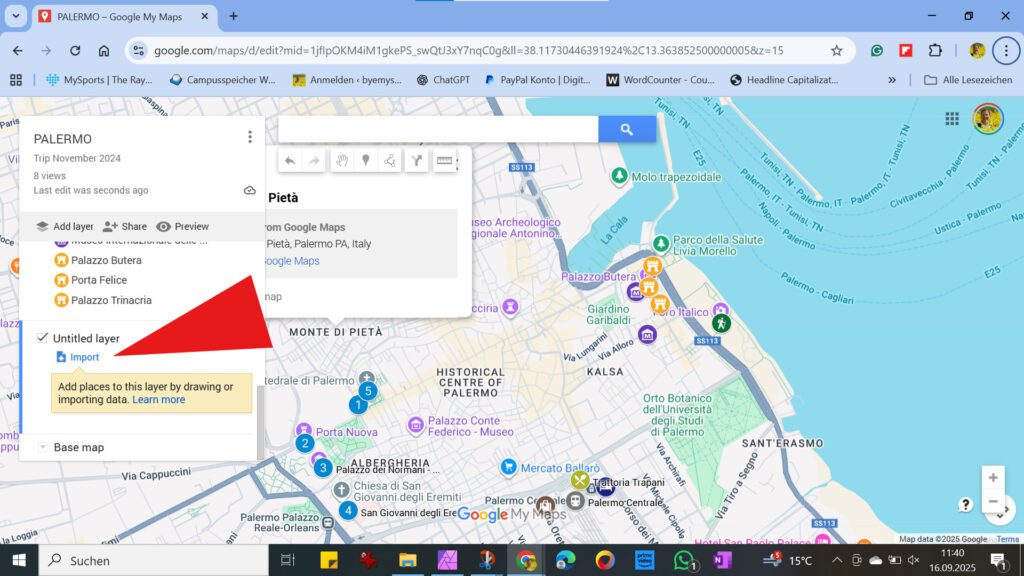
- To import your data, for instance, into a new map, you can click in a new layer on Import or on the three dots next to the layer’s title and take it from there.
If you want to import data into an existing layer that already contains spots instead of an empty one, you have to click on Reimport and Merge.
The same way you reimport data from another map, you can also import data, for instance, from a spreadsheet. I personally don’t do that since I like to see the spots I’m adding right on the map, yet it is an option.
Route Check
Once you’ve compiled your itinerary, there are several ways to check how much time you will need to complete the tour.
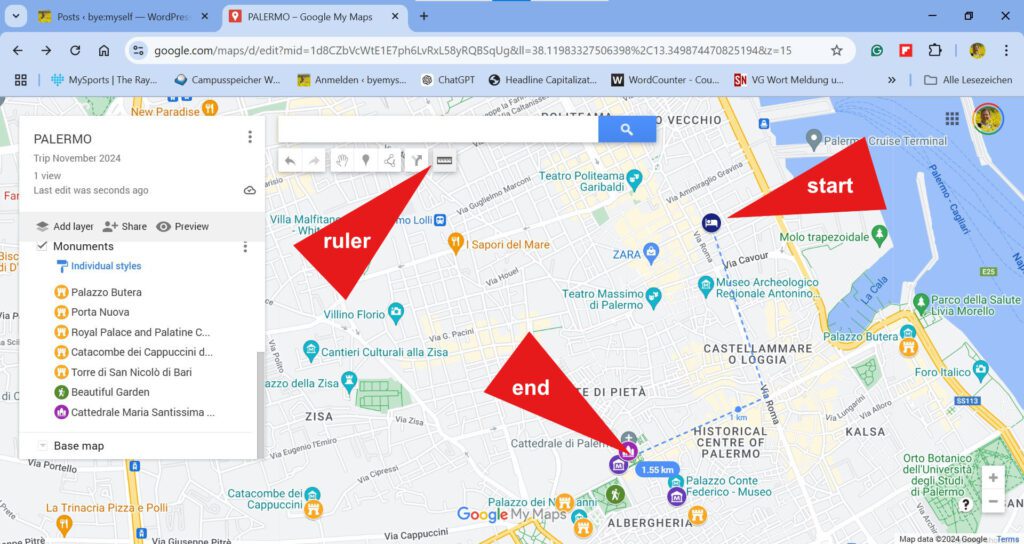
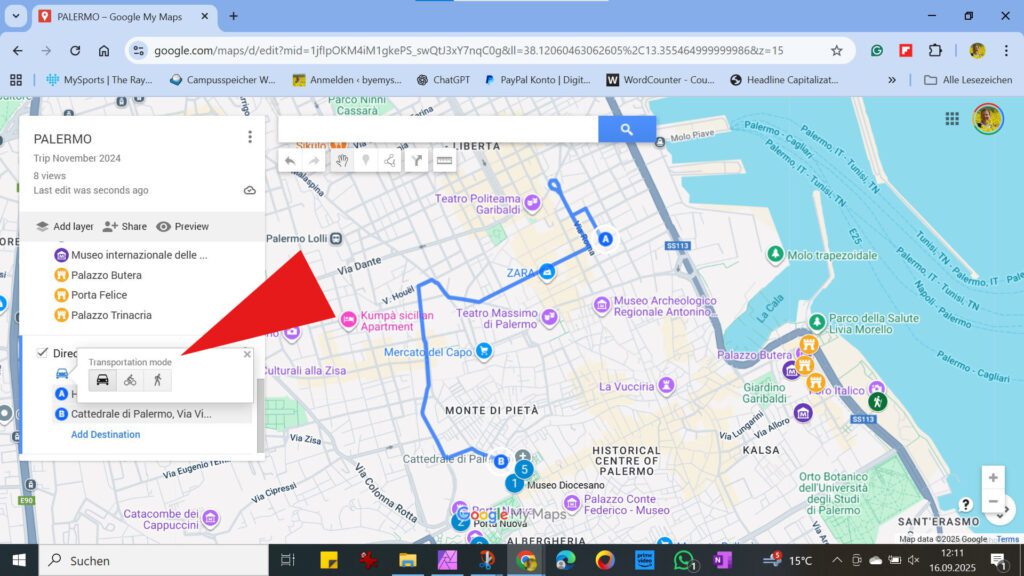
- First, there’s the little ruler. This ruler measures the distances between two points and gives you an estimate of how far you will be walking. After activating the ruler, click on your starting point. Then click on the first destination point, the second, the third, and so on. Double-click on the last destination point. At the end point, you will now see the total length of the route. In my example, the distance from the hotel to the cathedral is a bit over 1.5 kilometers.
- Another tool to measure distances and define routes is the small signpost next to the ruler. However, the huge difference between the ruler and the signpost is that the ruler cannot be saved, but only serves as a quick check while your map is open. As soon as you close your map, it disappears. The signpost, however, remains a part of your project unless you delete it deliberately. Yet, as you click on the icon, it creates an additional layer. Since this is one of the ten possible layers, you should keep this in mind when setting up your map: You’ll need an individual layer for your route check!
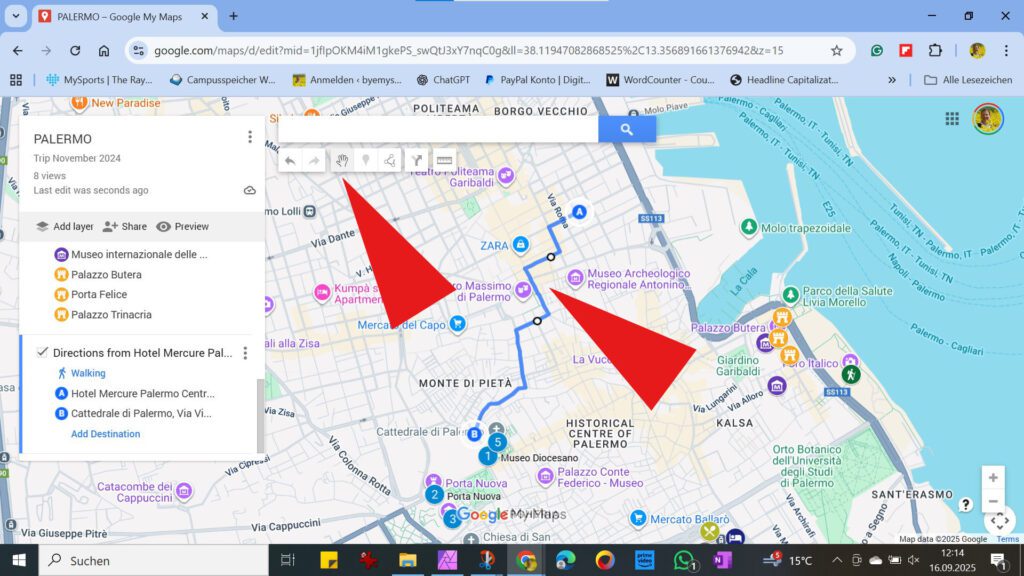
To start, click on the signpost icon next to the ruler. This opens a new layer with two endpoints. As with all other layers, you can name this one.
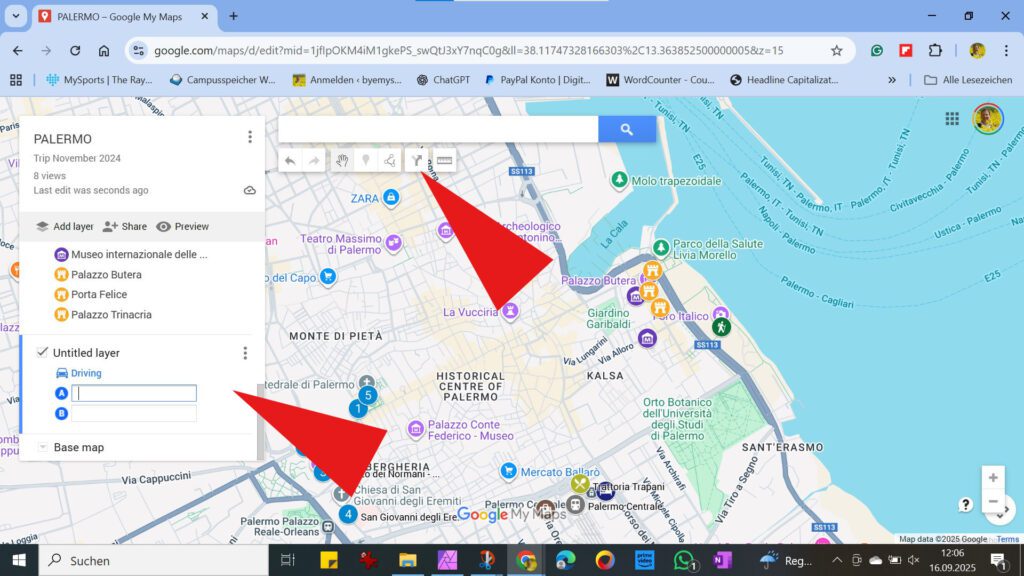
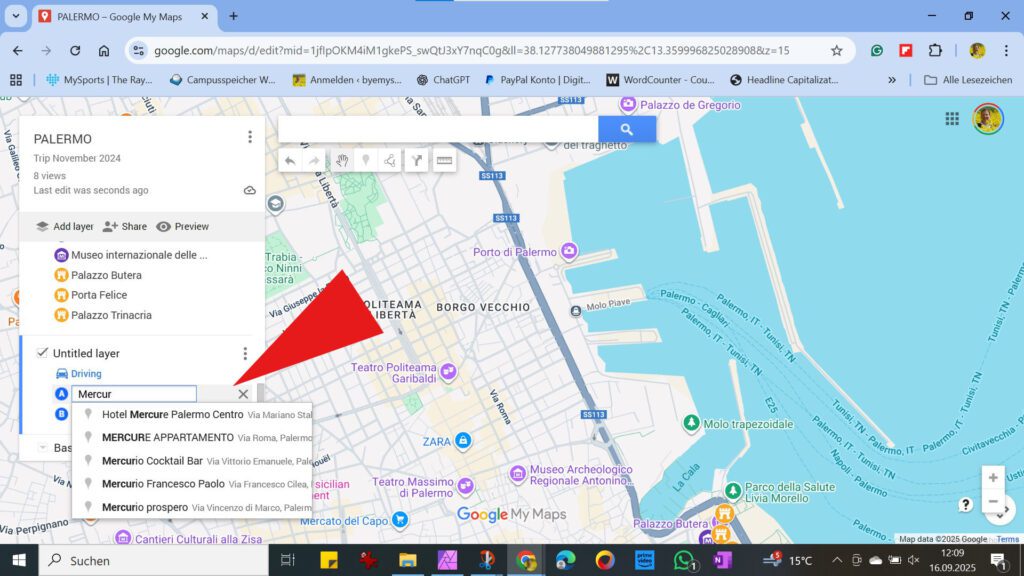
- Now you can fill in your starting point and the final destination. To do so, you can either type or click on one of your markers. As you are typing, Google My Maps will make some suggestions just like it does with the markers.
You can combine both ways of adding spots, hence, click on fields you already marked on the map, as well as type in additional locations.
- Once you’ve added your spots, Google My Maps will mark the best route.
In my example, I’ve only chosen two points. However, you can add more points by clicking on Add Destinations. Note that you can adjust the order of your spots whenever you like, Google My Maps will adapt the route accordingly.

- Google My Maps selects a route to be driven by default. You can easily change that by opening the menu right below the layer’s title and switching to either walking or cycling.
- And as genius as Google My Maps is, it automatically alters the route to a more convenient option!
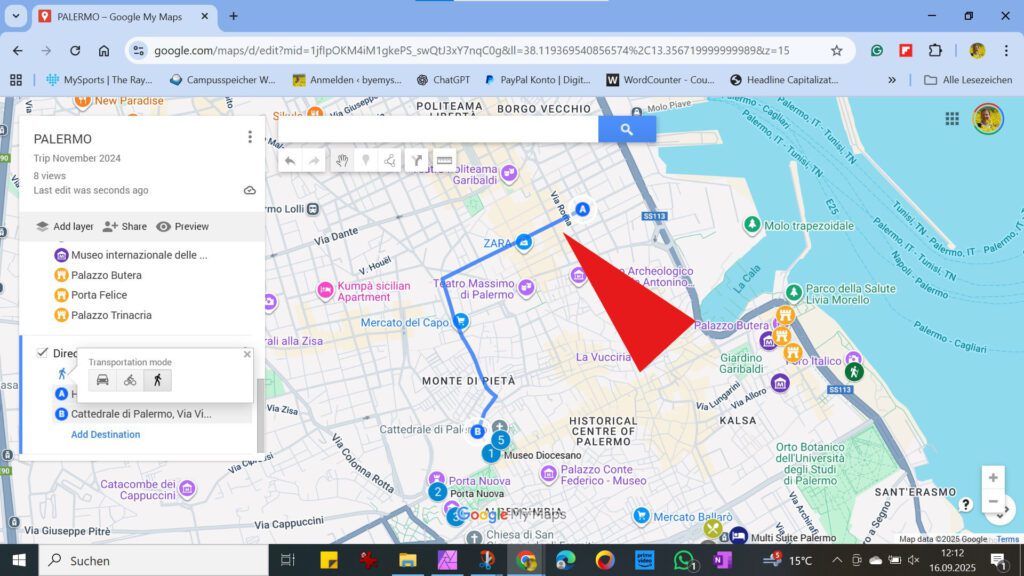
- Nevertheless, if you don’t like the route Google My Maps sketched, you can easily alter it by clicking on the little hand tool in the toolbar above and adjusting the line to your liking.
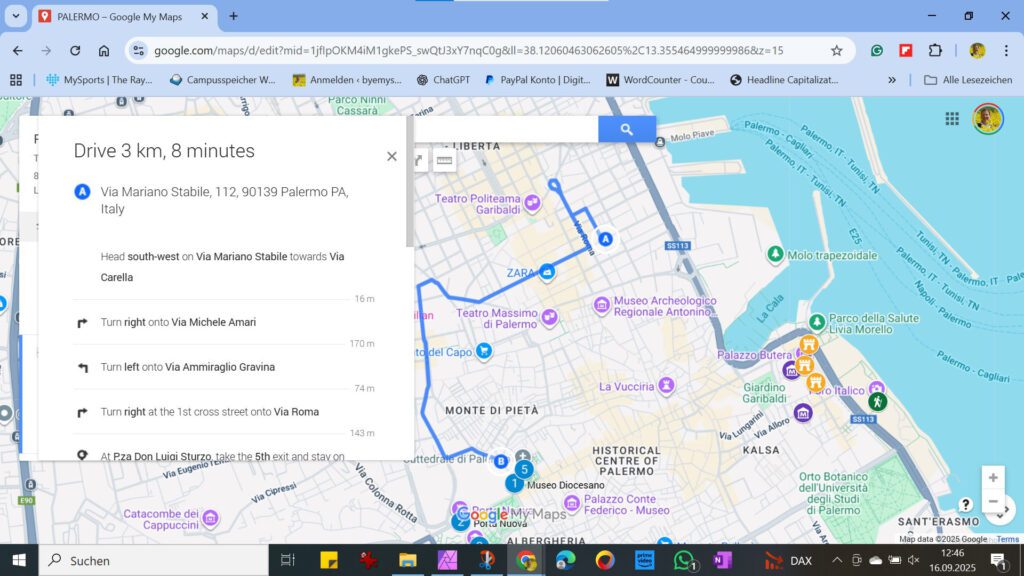
- Once you’re done with your routing, click on the three dots next to the layer’s title and choose Step-by-step directions from the dropdown menu.
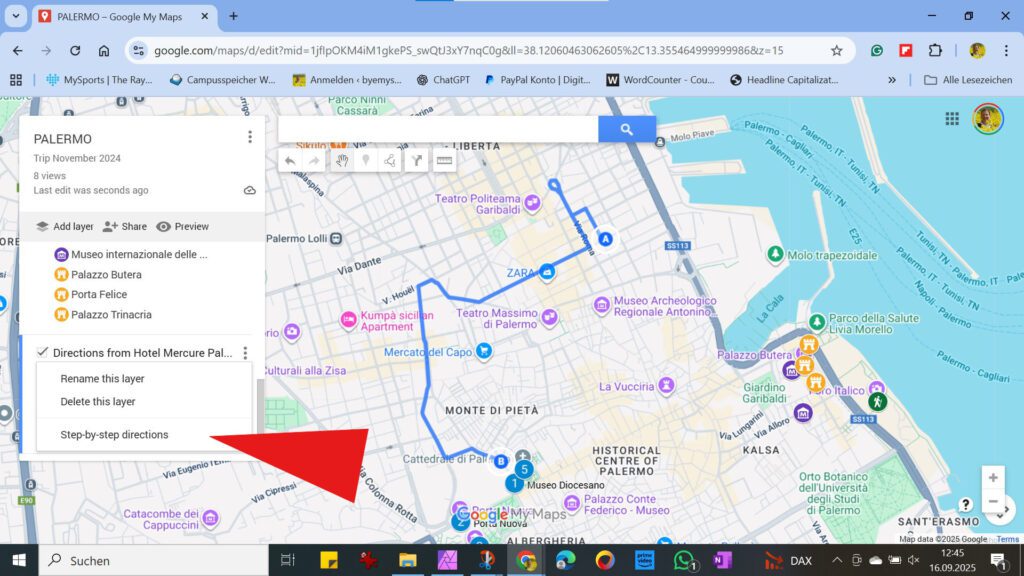
- A small window with all the relevant info will pop up: On the very top, you can see how long your route will approximately take.
Base Map Appearance
- If the map seems a bit too colorful and confusing, you can easily change that by modifying the background appearance. To do this, click on Base Map at the very bottom of your dashboard and select a background you like.
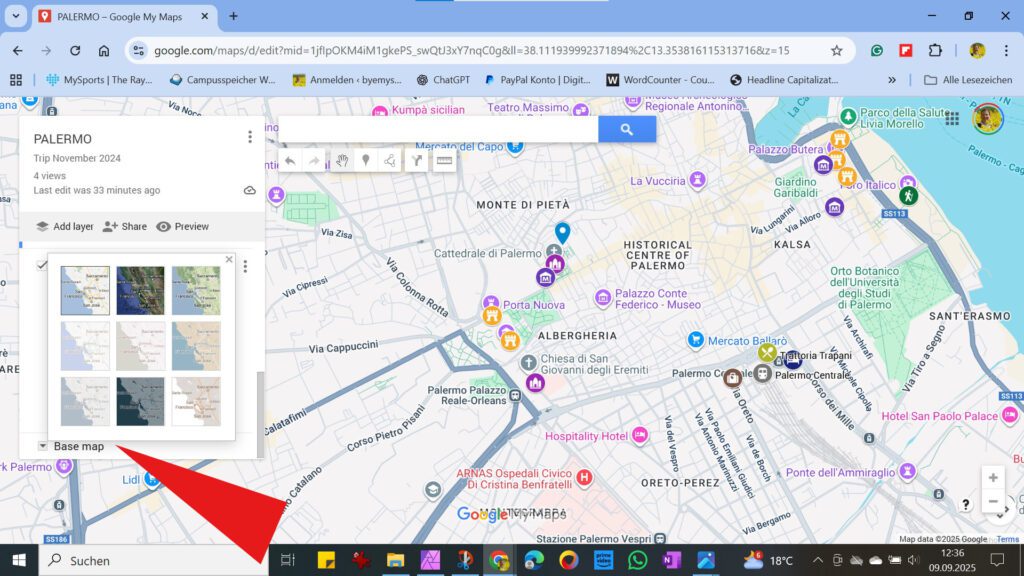
You can perform this step at any point during your card creation process. However, it’s often only at the end that you truly see how the card will look and which background works best.
However, keep in mind that although your markers will be easier to spot on some of the lighter maps, some of the standard map’s key features will be missing. All you will see will be your markers and nothing else. But here too, the only aspect that counts is that the map is perfect for your personal needs!
Final Appearance
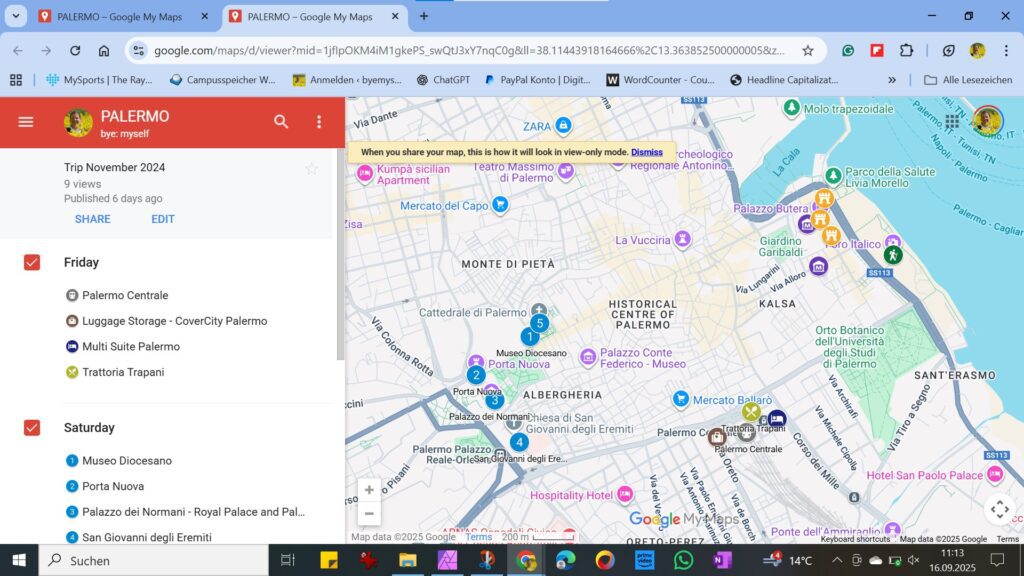
- In the preview mode, you can open your map to see what it looks like.
- When you share your map, this is how it will look in view-only mode.
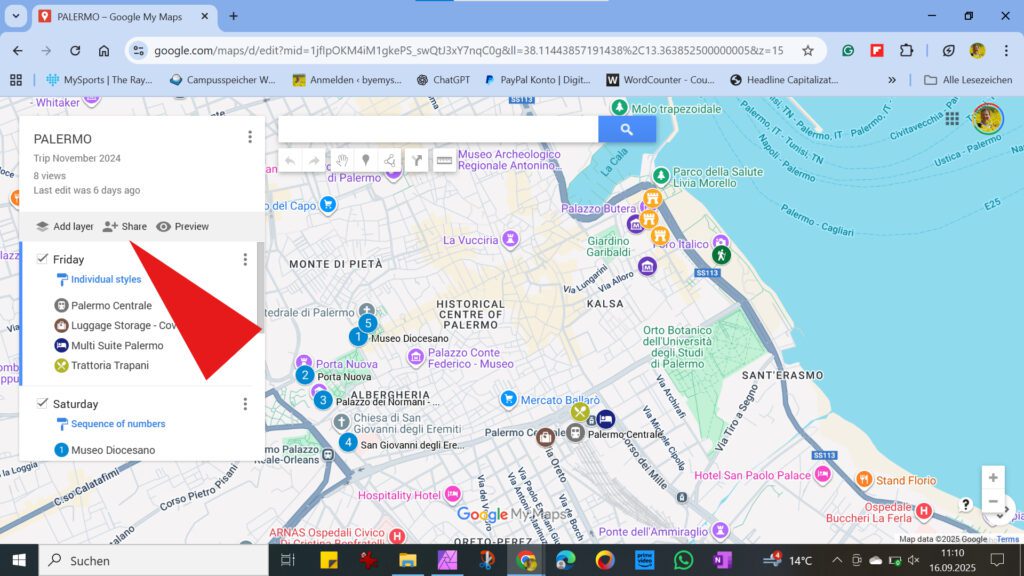
Sharing Your Map
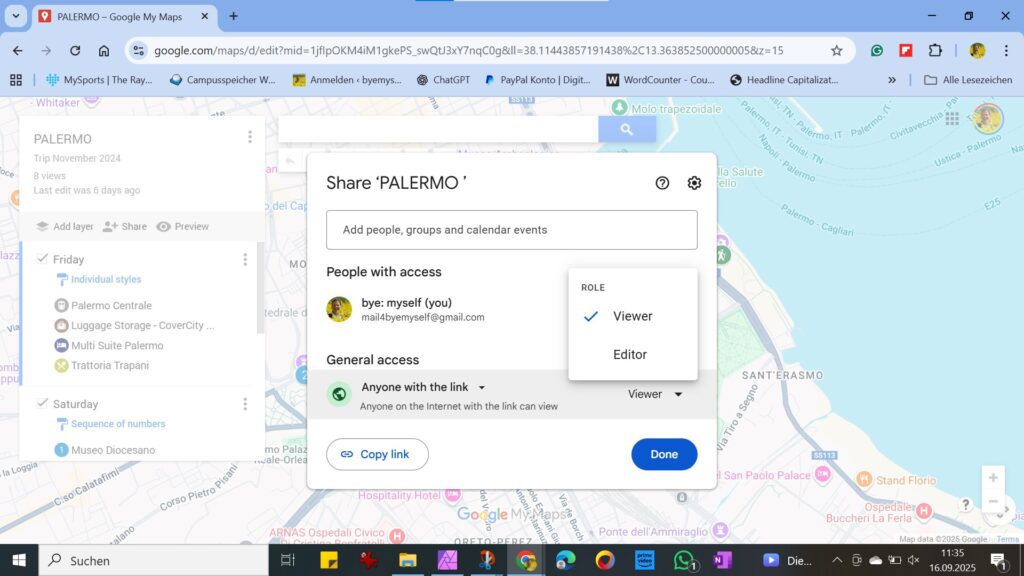
- As mentioned above, you can share your maps with others. By default, your project is always in private mode. You’ll need to change this if you want to share it with others or embed it.
First, click on Share.
- Now you define if anyone with the link can view your map, and if it can be found on the internet. Already as you choose that anyone with a link can view your map, Google My Maps generates a link that you can then share.
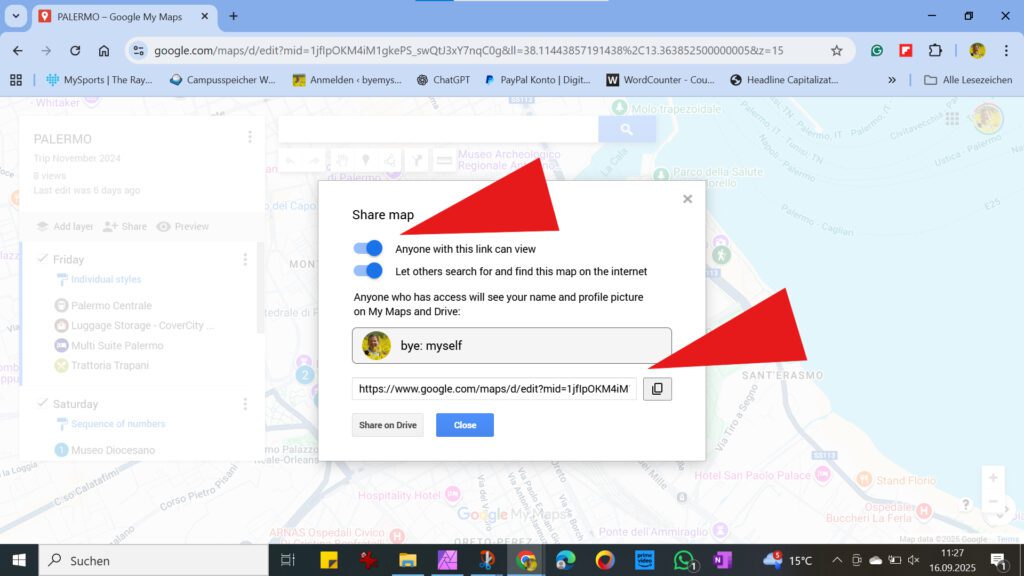
- However, you see that below the link, there is also the option to share your project on Google Drive. To do so, click on the button Share on Drive. Now you need to enter where and with whom you want to share your project in the empty field above. In the bottom right corner, you can select whether the person can only view the map or also edit it.
Bring Your Map Into Use
So after all this hard work and meticulous preparation, let’s bring your map into use. While I highly recommend creating your map on the big screen of a computer, you most probably will use it on a smaller device like your phone.
To use your map on your phone, you must, of course, be logged into your Google account there as well. It must be the same account as the one on your computer, obviously.
There are two ways to open your map. Both have their advantages and disadvantages.
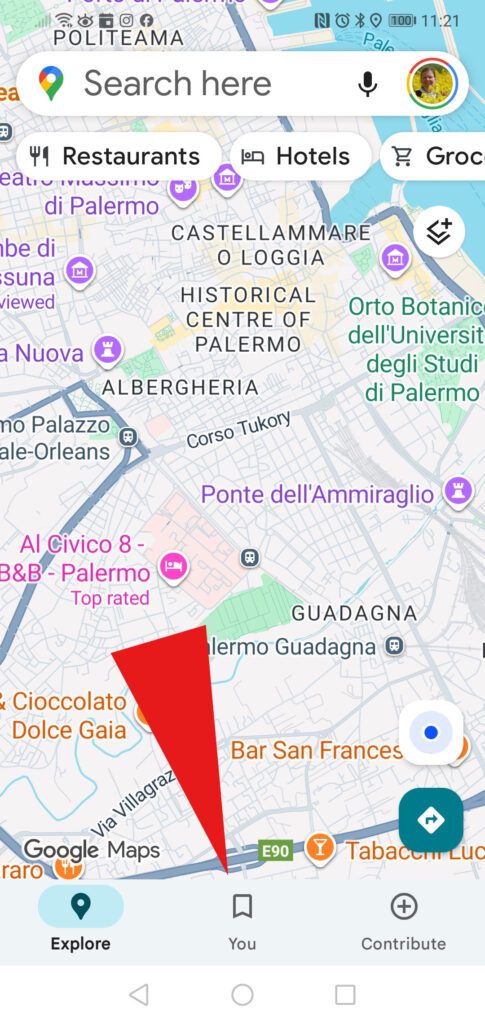
- First, you can open your map in Google Maps. To do so, open the App and click on You.
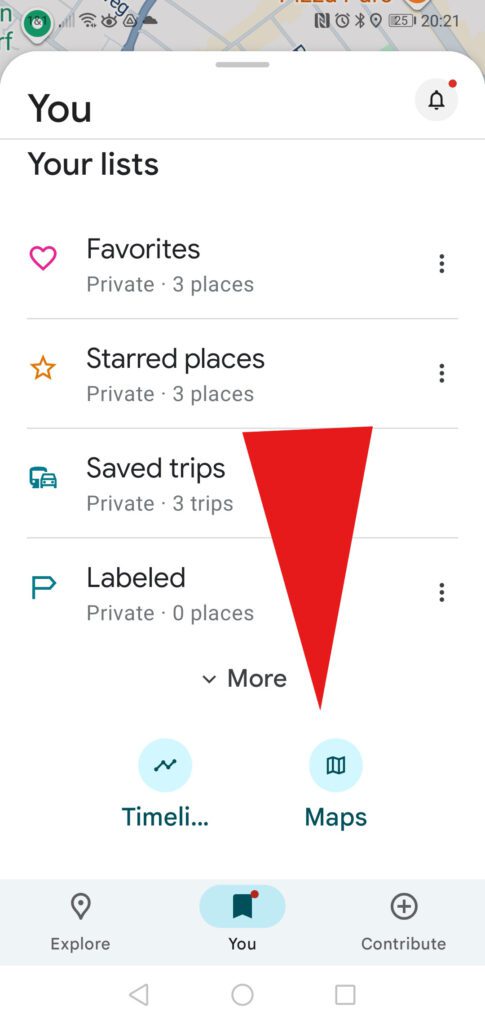
- On the next screen, you click on the small map icon.

- From the list of maps you’ve created, you click on the title to open the one you want to use.

- Now you can see your entire map in Google Maps. To view all the notes, photos, and other details you added to the pins, you have to click on the markers on the map, not in the legend.
However, you can open the legend by clicking on View map legend at the bottom of the screen.
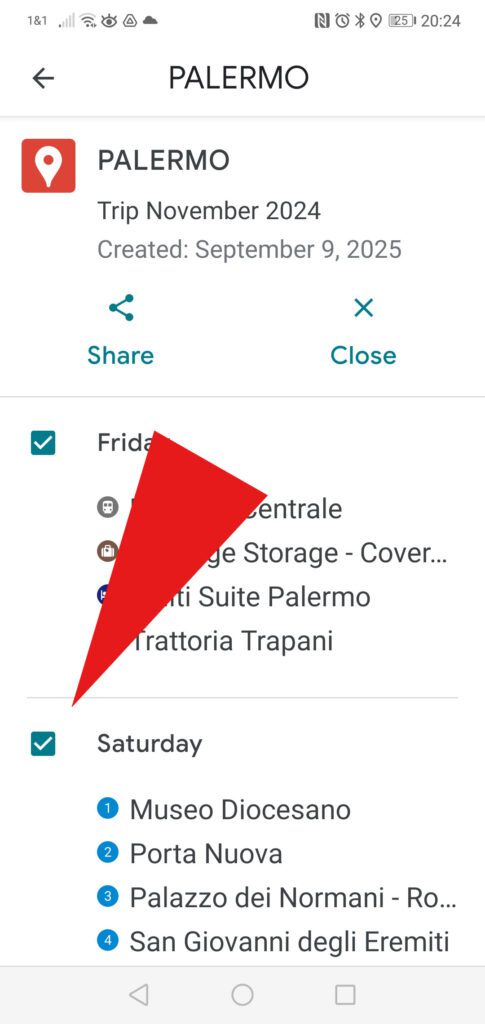
- Yet, at this point, the legend serves only as an overview since you cannot alter anything if you open your map in Google Maps. The only adjustment you can make is activating and deactivating individual layers.
However, there is a way to edit your map even on the go, we get to it further below.
- While you cannot edit your map in Google Maps, you can still use all the App’s features. For instance, if you are looking for a way to get from A to B by public transport, you can easily do so.
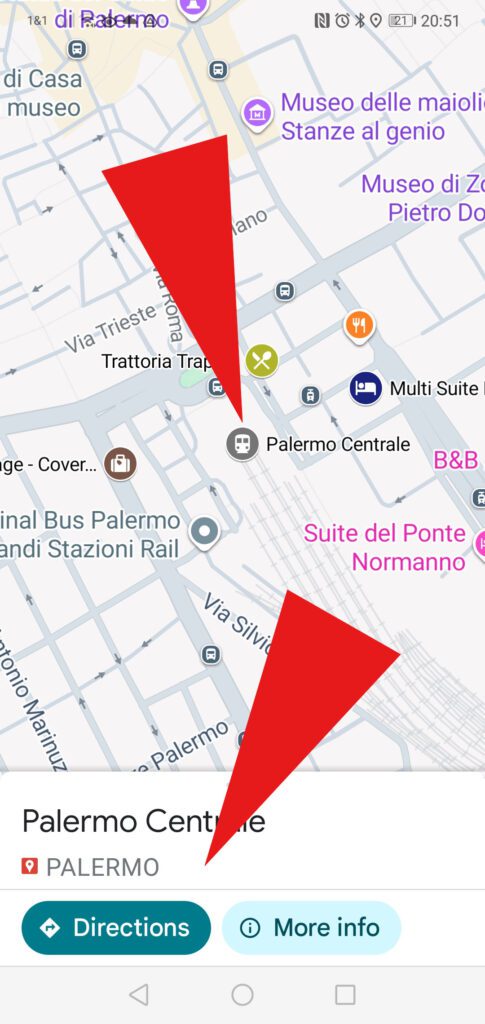
First, click on the spot you want to go to. In my example, it’s the main train station of Palermo that I’ve marked on my map.
As soon as I click on the marker, I get the title of the spot at the bottom of the screen, together with the option to get directions.
By the way, clicking on More Info takes you to your map’s legend.

- By clicking on Directions, you open a menu and can now choose from where you are heading to the train station. You can either click on Your location, choose a spot on the map, or type your start location in the field above.
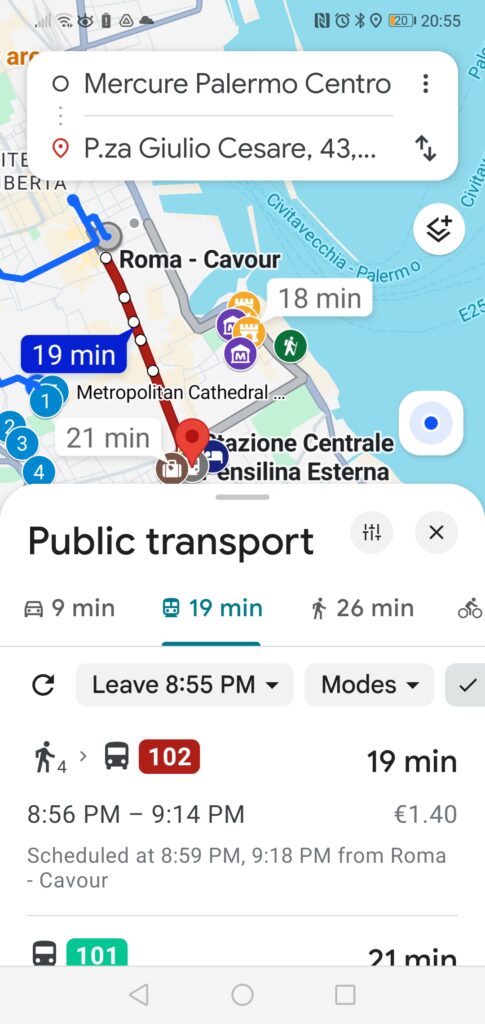
- In my example, I was looking for the way from the Mercure hotel, and Google Maps immediately gave me the best options on how to get from there by bus.
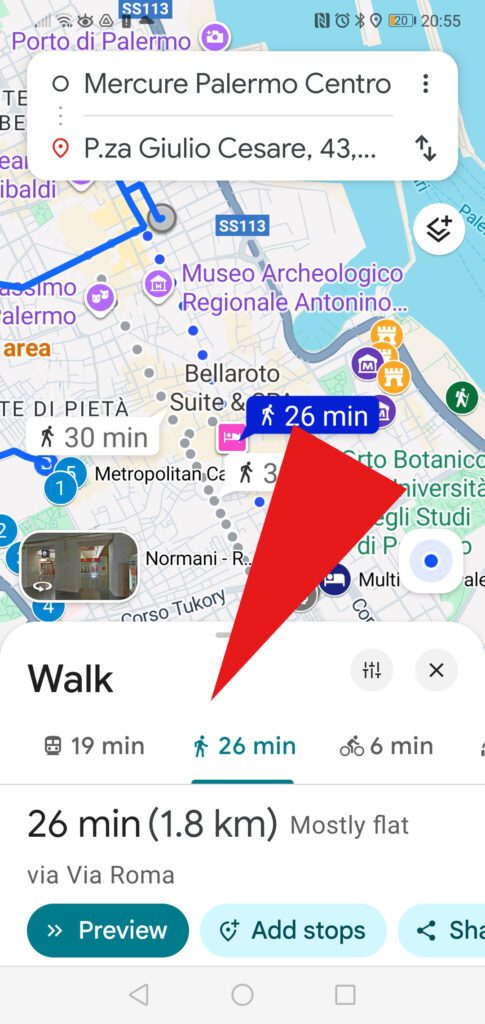
- Of course, you can also look for a walking route there by selecting from the icons below the map.
The benefit of opening your map in Google Maps is obvious: You have all your marked locations and can navigate between them as you’re used to in the app.
But the disadvantage is also clear: You can’t quickly adjust your map when necessary. However, it can be very useful to be able to add places to your map while exploring the city. For example, you’ve discovered a great restaurant that’s not on Google Maps, and now you want to put a marker at the exact location?
Well, good news, that’s possible!
As I explained at #14 above, you can mark random spots of your choice. All you have to do is click on the marker icon in the bar at the top of your map, and you can put a pin at any location on the map.
Albeit, to edit your map on your phone, you have to open it on the web instead of the Google Maps App.
- To do this, enter https://mymaps.google.com in your browser – and don’t forget that you must be logged into your Google account!
You get this window.
Note
I apologize that on my phone, Google My Maps is set to German. But you can easily orient yourself by the location of the buttons and menus.
- Now you choose from this dropdown menu the folder where your map is stored. If in doubt, just pick the first one, so you get to see all.
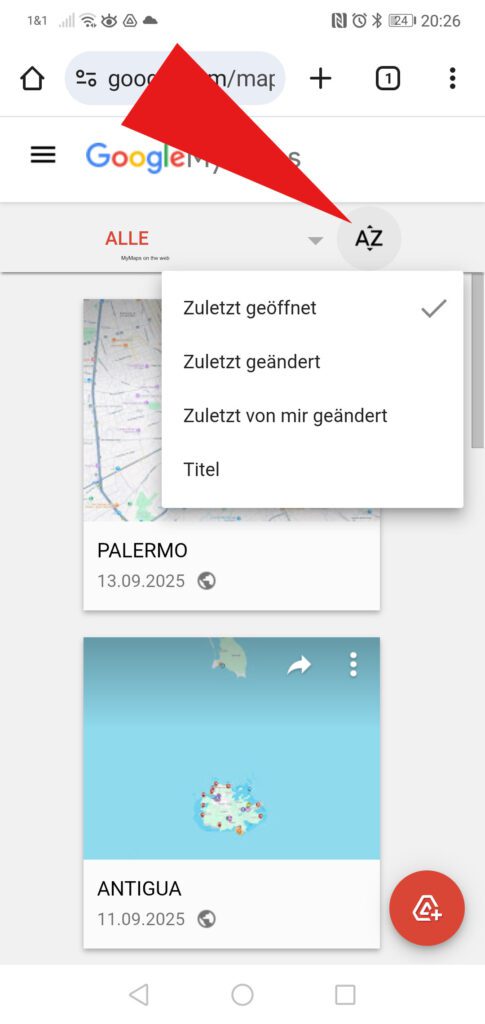
- From the dropdown menu at the upper right, you can define the order in which you’ll see your maps.
- Now you can open your map in My Maps and have it in the same mode as on your computer.
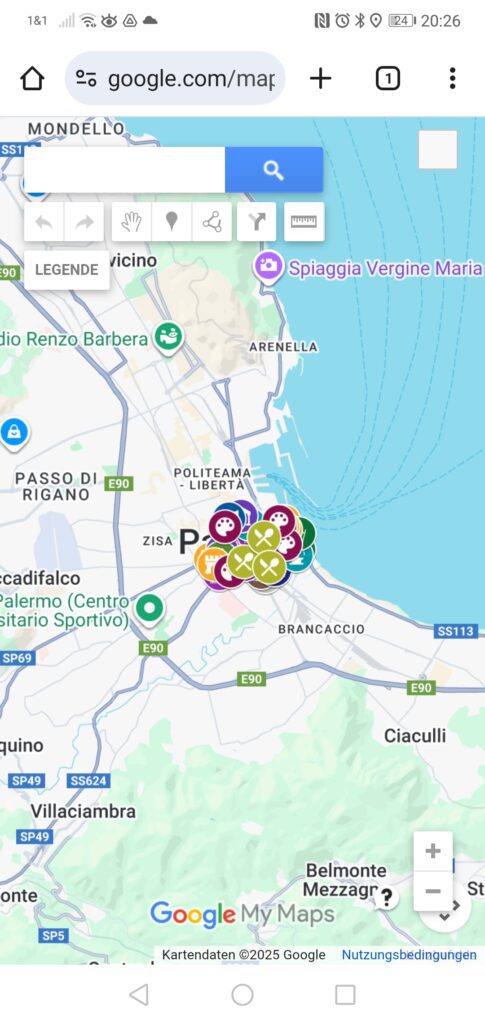
- While it’s possible to edit a map on your phone or even create one from scratch, you’ll find it incredibly tricky and error-prone. You’ll quickly realize how annoying this can be. I mean, you can see in this picture how crammed everything is, and you have to navigate all those tiny dots with your fingertips.
Therefore, I would always create the base map and as many steps as possible on your computer. You can then always make small additions on your phone, and that’s a huge advantage over opening your map in Google Maps.
Important Note
The advantage of being able to edit your map in My Maps comes with the significant risk of accidentally moving a marker or otherwise damaging something. You’ve probably noticed that you don’t need to intentionally save your map. My Maps automatically saves every project, including any changes—unfortunately, even unintentional ones.
So be careful!
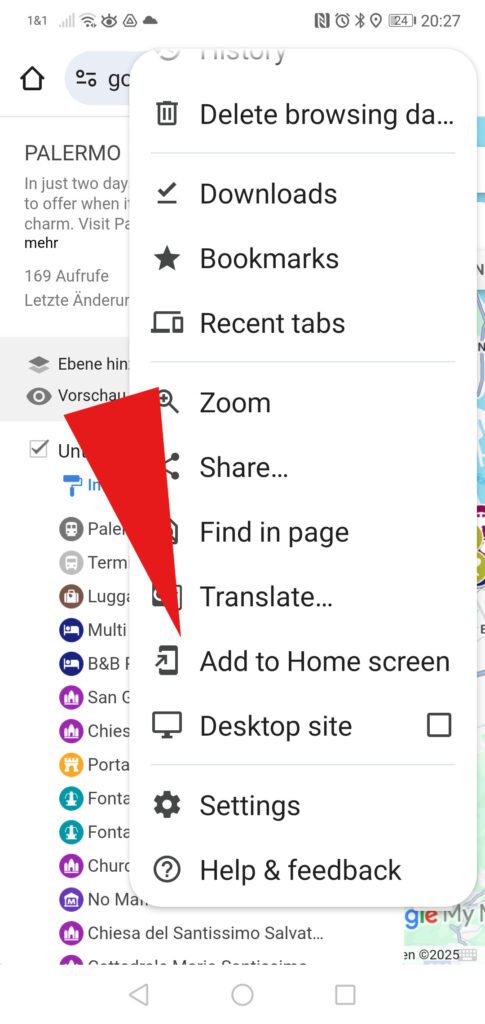
- One final tip: So that you don’t have to fiddle with your phone every time you’re on the go to open your map online, you can create a connection to your home screen.
To do this, tap the three dots in the top right and select the Add to Home screen option from the menu that now appears.
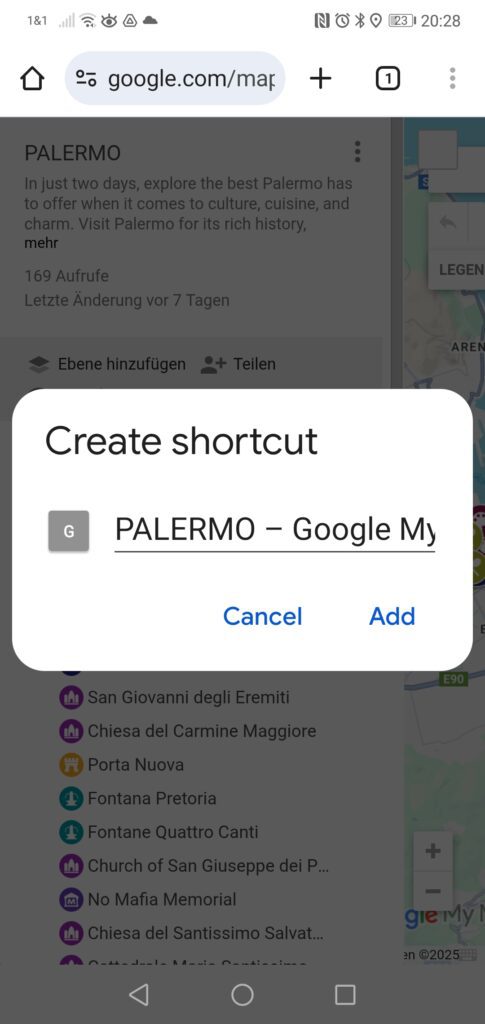
- Confirm this on the next screen, and voilà, you can now access your map online directly from your home screen!
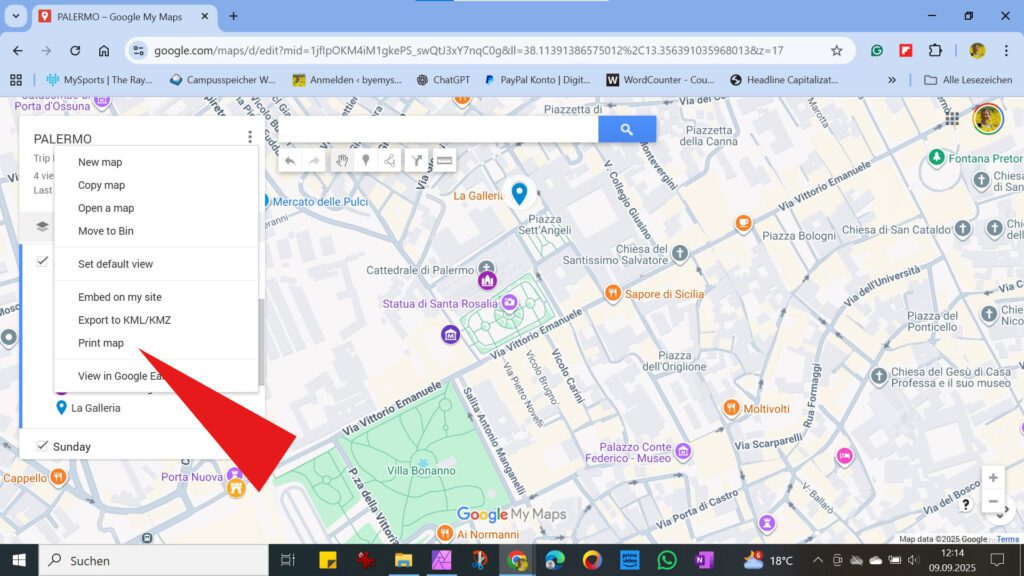
Printing Your Map
- If, for whatever reason, you want a hard copy of your map, you can print it out, obviously. To print your map, click on the three dots to the right of the map’s title to open the menu. Now, click on Print map.
- In the pop-up window, you define the format and other specifics.
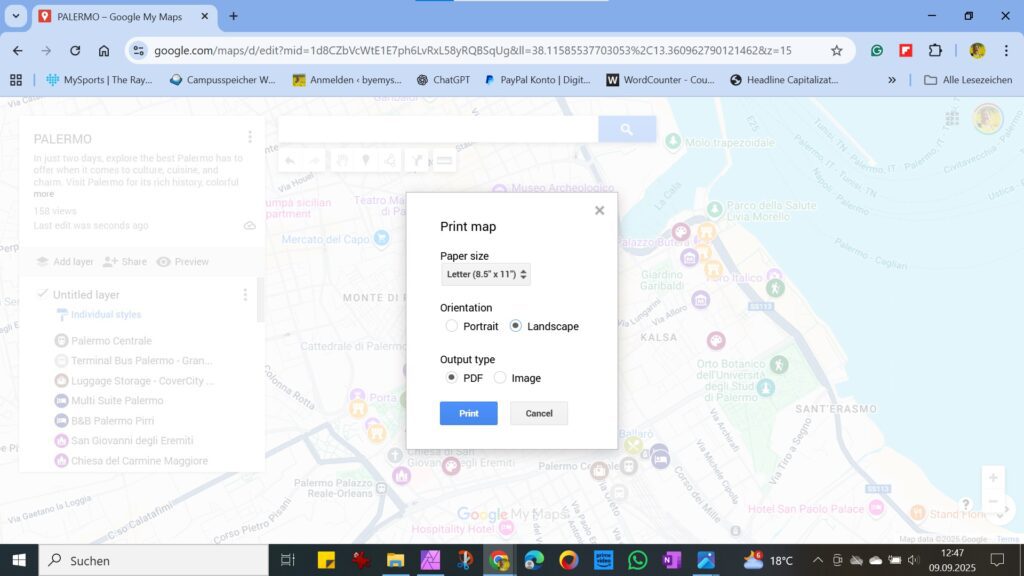
- Now, you can print your map.
I’m sure this very detailed guide will be a great help to you in your trip planning. However, I already put together a guide some time ago with lots of ideas and tips on how I plan and organize a trip from scratch. Hence, the post HOW TO PLAN A TRIP FROM SCRATCH is an excellent basis, respectively, an addition to this article.
Pinnable Pictures
If you choose to pin this post for later, please use one of these pictures:
Did You Enjoy This Post? Then You Might Also Like These:
Solo Travel With Kids: Baby, Toddler, School Kid, Teenager – How to Survive Travels With a Child

How (not) to behave in BALI

booking ahead versus walking in

Solo Travel: Pictures of Yourself – More Than Just Selfies

solo travel – PROs and CONs

Travel Planning With Google My Maps

Learning Languages for Travel – A Few Words About a Few Words

All you need to know before going to GERMANY

All Screenshots: Map data ©2024 Google and Map data ©2025 Google
Pinterest Pix: Globe with ship by Michaela 💗 from Pixabay, Hands by stokpic from Pixabay, and couple by pearly- peach from Pixabay.